Tango Editor Basics
Introducing the Tango Editor Interface and Tango Application Files
This chapter helps you orient yourself to the Tango Editor interface and some of the common operations available to you, and describes Tango application file operations.
The topics covered in this chapter include:
- Tango Editor interface components
- overview of the Tango Editor interface
- using contextual menus
- using HTML editing windows
- using Word Wrap
- working with multi-column lists in action editing windows
- using the SQL Query window
- finding and replacing text or regular expressions
- keyboard shortcuts.
- Using Tango application files
- XML file format details
- the Tango application file window
- creating and saving Tango application files
- debugging Tango application files
- executing Tango application files
- converting Tango application files from previous formats.
Tango Editor Interface Components
When you double-click the Tango Editor icon, the main Tango interface components appear.
The menu bar shows the menus and commands applicable to Tango.
The Tango application file window is where you create and edit your Tango application files.
The Workspace has tabs for Project, Data Sources, Objects, and Snippets. You switch among the four sections of the Workspace by clicking the corresponding tab. The four sections are called Project Workspace, Data Sources Workspace, Objects Workspace, and Snippets Workspace, respectively.
Click icons on the Attributes palette to assign attributes to selected actions.
Click icons on the Actions palette and drag them into an open application file to add them to the file.
You can choose to show or hide the Workspace window and any of the palettes by enabling the component's name from the Windows menu. A check mark beside the name indicates the component is visible in the interface. Uncheck the name to hide the component.
Contextual Menus
In many Tango Editor interface components, you can position the cursor on a particular area and control+click the mouse to display a contextual menu of commands. The commands that appear relate to the item you click. Grayed-out commands are not applicable to the current item.
Properties Window
The Properties window allows you to view information about and add comments to a selected item. Selectable Tango items include data sources (including tables and columns), application files, and actions. In general, the Properties window changes to show the properties of the currently selected item.
To open any Properties window
The Properties window can be left open. Clicking an item with properties updates the window to show information about that item.
HTML Editing Window
Most actions in an application file can have HTML associated with them. Whenever you select an action and an attribute option, the HTML editing window appears.
The title of the window follows the form:
<Document> : <Action> : <HTML>
Tango Editor supports the standard editing commands. The Edit menu displays the following commands:
Contextual Menu
You can also control+click in the HTML editing window to display a similar menu at the cursor position in the window.
The following table lists the commands in the contextual menu:
Command |
Function |
Removes the selected text from the window and places it on the clipboard. |
|
Displays the Insert Meta Tag dialog box. For more information, see "Inserting Meta Tags". |
|
Opens the file which the selected <@INCLUDE> tag points to. The file is opened with either Tango Editor or the application used to create the file, as specified in the Preferences dialog box. |
|
Opens the file which the selected <@INCLUDE> tag points to. The file is opened with the application specified in the External Editor field in the Preferences dialog box. |
Closing the window automatically saves any changes you make. To cancel any changes, you can choose Undo from the Edit menu or the contextual menu, or close the file without saving it.
Syntax Coloring
For more information, see"Setting Preferences".
To make editing of your files easier and clearer, many of the HTML and text components that appear are color-coded--HTML, Tango meta tags, attributes, default text, and comments. You can change the specified colors.
You can enter any amount of text in an HTML editing window. You can also drag and drop text from elsewhere, for example, from other editing windows.
Word Wrap
Word wrap is also available in the HTML editing window. From the Windows menu, choose Word Wrap to enable and disable it. A checkmark indicates that word wrap is enabled.
Indenting and Selecting Text
You can position text using tab characters. Tabs are stored as tab characters and are not converted to spaces. Tabs have no effect on the display of HTML in the Web browser; they are used to make the HTML you enter more readable.
For more information on the Preferences dialog box, see"Setting Preferences".
You specify the number of space characters that equal one tab character in the Tab size field of the Preferences dialog box. You can also specify whether you want Tango to insert tab characters to start a new line at the same indent level as the previous line by enabling or disabling Auto-indent in the Preferences dialog box.
HTML Editing Window and Attributes
The HTML editing window allows you to easily access any of the HTML attributes that may be assigned to an action: Results HTML, No Results HTML, and Error HTML. Not all attributes may be assigned to all actions: the applicable attribute tabs for the selected action appear enabled at the top of the window; unavailable tabs are grayed.
Within the HTML editing window, you can switch between the different HTML attributes by clicking the appropriate tab.
You can also open the attribute HTML associated with an action by doing one of the following:
For information on new keyboard shortcuts, see "Keyboard Shortcuts".
For more information on customizing page and response HTML for the Search Builder, see "Configuring the Search Builder".
The Search Builder also uses HTML editing windows so you can customize page HTML (Header and Footer) and response HTML (Update Response, Delete Response, and No Results) for the Search, Record List, and Record Detail pages.
For example, the following HTML editing window shows the Header HTML for the Search Builder's Record Detail page in the Sample.taf application file.
Creating a New HTML or Text File
In addition to editing the HTML associated with an action or a builder, you can use Tango's editing capabilities to create and edit HTML and text files. The editing capabilities and window settings described for HTML action attributes also apply to HTML and text files opened for editing with Tango Editor.
To create a new HTML or text file
The default window name is "untitled", until you save it under another name. Subsequent new windows are named "untitledn", where n is the next number in the series; that is, the second window opened is "untitled2", and so on.
To save a new HTML or text file
- From the File menu, choose Save or Save As.
- In the File name field, type the
name of your file.
When you save a new text file and a project is open, Tango asks if you want to add the saved file to the open project.
To open an HTML or text file
- From the File menu, choose Open.
- Select the file to open.
- Click Open.
 Tip: You can also open a file
of a supported type simply by dragging it from the Finder onto the Tango Editor
icon, whether or not Tango Editor is already open.
Tip: You can also open a file
of a supported type simply by dragging it from the Finder onto the Tango Editor
icon, whether or not Tango Editor is already open.
<@INCLUDE> in HTML Editing Windows
HTML editing windows in Tango can contain <@INCLUDE> meta tags, which, when executed by Tango Server, return the contents of a specified file. When you edit text and HTML in the HTML editing window, you can open files referenced with <@INCLUDE> by selecting one of the commands Open Selected <@INCLUDE> or Open Selected <@INCLUDE> with.
![]() Note: In order for the
Open Selected <@INCLUDE> and Open Selected
<@INCLUDE> with commands to function correctly, the application
file and the included file you want to access must be in the current project,
or they must both be located in the same folder. Otherwise, Tango Editor will
be unable to find the file.
Note: In order for the
Open Selected <@INCLUDE> and Open Selected
<@INCLUDE> with commands to function correctly, the application
file and the included file you want to access must be in the current project,
or they must both be located in the same folder. Otherwise, Tango Editor will
be unable to find the file.
Open Selected <@INCLUDE>
Open Selected <@INCLUDE> causes Tango to open the file referenced by <@INCLUDE> according to the preferences you have set in the Preferences dialog box. For example, if you have set the Open text files using option to Tango Editor, the included file opens in Tango Editor. If you have set this option to Application used to create the file, the included file opens in the application with which it is associated. If you have set this option to Selected external editor, the included file opens in the application you have specified in the External editor field in the Preferences dialog box.
To open an included file using Open Selected <@INCLUDE>
Select the <@INCLUDE> tag that you want to open, and do one of the following:
For more information, see "Setting Preferences".
The included file opens in either Tango Editor or an external editor, depending on your preference settings.
If there is more than one included file with the same name in the project, the Multiple Matching Files dialog box appears:
Select the included file you want to open and click OK.
![]() Tip: You can open multiple
included files simultaneously by selecting all the tags and choosing
Open Selected <@INCLUDE>.
Tip: You can open multiple
included files simultaneously by selecting all the tags and choosing
Open Selected <@INCLUDE>.
Open Selected <@INCLUDE> with
Open Selected <@INCLUDE> with causes Tango to automatically open the selected included file in the application you have specified in the External editor field of the Preferences dialog box. Even if you have your preferences set to open the file automatically in Tango Editor or the application used to create the file (that is, Tango Editor or Application used to create the file is selected in the Open text files using section of the Preferences dialog box), Tango still uses the application which appears in the External editor field to open the included file.
You can open a selected <@INCLUDE> tag with this command in the same way as Open Selected <@INCLUDE>; see the previous section.
Working With Multi-column Column Lists
Many Tango actions include multi-column lists for entering parameters--the criteria list in the Search action, for example. This section describes basic techniques for working with these lists.
To select an entire row
To move a row
Select the row and drag it to the desired location.
Pop-up Menus
Various columns have pop-up menus in each cell. Place the cursor in the cell and click the mouse. A downward-directional arrow appears. Click the arrow and the pop-up menu appears.
From a cell's pop-up menu, you can select from preset values.
To resize a column
Click the edge of the column in the list's header, and drag.
To resize a column to fit the data in it, double-click its right edge in the header.
To delete a row
Dragging Columns
When creating or modifying a Tango application file and actions, you must specify which database columns to use in various places. To do this, you drag the columns from the Data Sources Workspace to the appropriate place in the file.
To ... |
Do This ... |
Click the first column you want to select and Shift+click the last one. |
|
Click the first column you want
to select and
|
|
To see the Data Sources Workspace, click the Data Sources tab. A workspace appears, containing information about data sources, such as the currently defined data sources and all tables and columns. If no data sources are set up yet, only the data source types appear.
If word wrap is disabled, a horizontal scroll bar is available to view text outside the boundaries of the window.
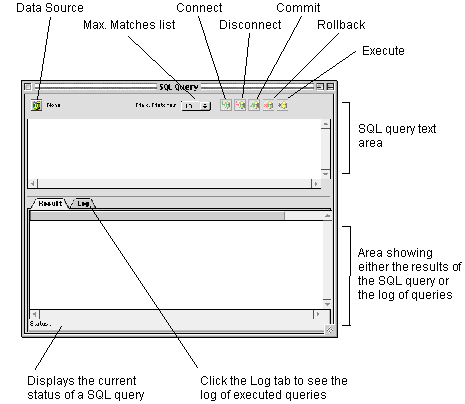
The SQL Query Window
The SQL Query window gives you a convenient way of performing simple SQL queries within Tango Editor, for example, to test your Direct DBMS actions or to check database values.
To perform a SQL query, see "Performing a SQL Query".
The SQL Query window displays the following components:
Setting Up a SQL Query
The components and functions of the SQL Query window are as follows:
Data Source button allows you to specify the data source you want to perform query operations against. When you first open the SQL Query window, the data source is set to None.
If you change the data source assigned to the window, any existing connection closes.
Max. Matches displays the maximum number of records you want the SQL query to return. You can select from 1, 10, 25, 50, or 100. The default is 10.
For more information on SQL COMMIT and ROLLBACK operations, consult your SQL documentation.
Commit and Rollback buttons allow you to perform a SQL COMMIT or ROLLBACK operation on the assigned data source. COMMIT causes any changes made to the data source by the query to be saved. ROLLBACK causes any changes made by the query to be discarded.
These buttons are disabled when you are not connected to a data source.
Connect and Disconnect buttons allow you to connect to or disconnect from the current data source.
When you try to connect without first assigning a data source, the Data Source Selection dialog box appears; you must select a data source.
Execute button allows you to execute the SQL query in the query text area. If you are not connected to the data source when Execute is selected, the connection is made automatically.
Any data returned by the SQL query appears in the Results area of the SQL Query window. If the Results area contains data and the current query returns no data, the Results area is cleared of any data.
After execution, the connection to the data source remains open.
To cancel an executed query, press esc or
 +. (period). If results are being returned when a
cancel request is made, the Results area shows all the data
returned to that point.
+. (period). If results are being returned when a
cancel request is made, the Results area shows all the data
returned to that point.
You can specify a different default font for text appearing in the SQL query text and results areas in the Preferences dialog box; see "Setting Preferences".
For more information, see "The SQL Query Window".
Query Text Area displays the SQL query text to be executed.
The query text area supports standard cut, copy, and paste operations, including drag and drop. You can drag and drop tables and columns into the SQL Query text area from the Data Sources Workspace.
You can also drag any database action (except Transaction) from an application file to the SQL Query window to see the SQL Tango generates for it.
If you select only part of the SQL when executing the query, only that part is sent to query the database.
Results tab displays in columns and rows the results of the SQL query.
Status Area shows the current status of the SQL query. The status messages appear as follows:
Status
Description
Dragging Actions into SQL Query Text
You can drag any database action, except a Transaction action, which does not generate SQL, from an application file into the SQL Query window.
When you do this, some SQL Query window attributes are set based on the contents of the action. The following attributes are automatically set:
- Max. Matches (for a search action) is set to the action's maximum matches value; otherwise, it is set to unlimited.
- The data source is set to the action's data source, and closes any existing database connection (if the data source is different from the current data source).
- The SQL text is the data source-specific SQL that
Tango Server generates when the action is executed.
 Note: Any meta tags from the
action are placed in the text as-is. The SQL text also does not include any
text automatically added to the action's SQL by the server (such as a $maxrows
assignment with DAM data sources).
Note: Any meta tags from the
action are placed in the text as-is. The SQL text also does not include any
text automatically added to the action's SQL by the server (such as a $maxrows
assignment with DAM data sources).
- The Results area is cleared of the currently displayed results.
Performing a SQL Query
For more information,
see "Working With Data Source
Properties".
To perform a SQL query
- Choose the SQL Query command by doing one of the following:
- Click Data Source.
When you first open the SQL Query window, the data source is None.
- Select the data source you want to perform SQL Query window operations against, and click OK to load the tables and columns of that database. A Log In dialog box appears, allowing you to type your user name and password.
- Enter your user name and password into the respective fields, and click OK.
- From the Max. Matches menu, select the maximum number of records to return from a SQL query: 1, 10, 25, 50, or 100.
- Click Connect to connect to the current data source.
- In the SQL Query text area, enter the SQL query text to be executed.
- Click the Execute icon.
If you select part of the SQL in the SQL Query text area, only that part is executed when you click the button.
- If you want to perform a COMMIT or
ROLLBACK operation on the assigned data source, click the
corresponding Commit or Rollback button.
The results of the SQL query, if any, appear in the Results area.
Finding and Replacing Text
In Tango Editor, you can perform operations to find, or to find-and-replace text in application files. Tango Editor can perform both normal searches and searches using regular expressions.
For more information on regular expressions, see "Using Regular Expressions".
Performing Find Operations
For the purpose of this discussion, the term string refers to both character strings (that is, text) and regular expressions . You specify that the search is to treat the string in the Find field as a regular expression by selecting the Regular expression option in the Find & Replace dialog box.
If you want to find or replace a certain string, you specify that string in the Find & Replace dialog box.
You can find any string that can be entered in any non-modal Tango Editor window. This includes values in criteria lists, action parameters you have entered--such as for the Limit to field in a Search action's Results window, custom SQL, If action conditions, External action parameters, custom column definitions, and HTML. Tango Editor cannot find a string you did not explicitly enter, for example, data source names, user names or passwords entered by users, column names in Select lists, and join information.
You can perform find-and-replace operations in open application files, action editing windows, HTML editing windows, and projects. Unless specified otherwise, Tango Editor begins searching at the insertion point indicated by the cursor and continues to the end of the search range specified in the Find In section of the dialog box.
To find or find-and-replace a string
- Find. Enter the string you want to find.
- Replace with. Enter the string that you want to replace the string in the Find field with.
- Match case. If you want to perform a case-sensitive search, select the Match case option; otherwise, Tango Editor searches for a match irrespective of letter case. For example, a search for "customer" would find all instances of "customer", "Customer", and "CUSTOMER".
- Regular expression. If you want to search for the string as a regular expression, you must select the Regular expression option. Otherwise, a normal search is performed.
- Find in. You specify the search
range in this area of the dialog box.
Current window. Select this option to perform the find or replace operation in the window active at the time you choose the Find or Replace command. If you have a string selected in the active window, it automatically appears in the Find field.
File filename. Select this option to perform the find or replace operation in the file specified by filename. The name of the currently active file automatically appears as filename.
All files in project. If you have a project open, this option is checked. Select this option to perform the find or replace operation in all the files of the active project. If you have another application file open at the same time, which is not part of the project, Tango Editor excludes it from the find or replace operation.
- Start at top. Select this option to
start the find or find-and-replace operation at the top of the search range
specified in the Find in section.
Tip: To start your search at
the top of your project, check All files in project and
Start at top in the Replace dialog box.
If this option is not selected, Tango Editor performs the search starting from the current cursor position.
Note: If the current cursor
position is not within that range, the current cursor position is ignored and
the search starts at the top of the specified range.
- Find. Click to start the search for the string specified in the Find field from the specified starting position.
- Replace. Click to replace the string
specified in the Find field with the string specified in the
Replace with field. Following the replace operation, Tango
Editor automatically searches for the next instance of the find string.
You can undo the last replace performed by choosing Undo from the Edit menu.
- Replace All. Click to replace
automatically all instances of the string specified in the
Find field with the string specified in the Replace
with field.
A dialog box appears, indicating the number of replacements made.
Note: You cannot undo the
Replace All operation. You can, however, choose to close a file without saving
the changes to return it to its former state.
If the search range involves several items, those items in which replacements are made are opened so you can save or discard the changes.
- Cancel. Click to end the find or find-and-replace operation and to close the dialog box.
You can also choose Find Again from
the Edit menu or press
![]() +G,
which searches again for the string or regular expression previously entered in
the Find and Replace dialog box.
+G,
which searches again for the string or regular expression previously entered in
the Find and Replace dialog box.
Using Regular Expressions
A regular expression is formed by one or more special characters that represent a string of text.
![]() Note: To find a special
character, precede it with a backslash, for example, \* finds the
asterisk (*) character.
Note: To find a special
character, precede it with a backslash, for example, \* finds the
asterisk (*) character.
To find any single character
A period (.) finds any character except a newline character.
Expression ... |
Finds ... |
To repeat expressions
Repeat expressions with an asterisk (*) or a plus sign (+).
A regular expression followed by an asterisk finds zero or more occurrences of the regular expression. If there is any choice, Tango Editor chooses the longest, left-most matching string in a line.
A regular expression followed by a plus sign finds one or more occurrences of the one-character regular expression. If there is any choice, Tango Editor chooses the longest left-most matching string in a line.
Expression ... |
Finds ... |
To group expressions
If an expression is enclosed in parentheses, ( ), Tango Editor treats it as one expression and applies an asterisk or plus sign to the whole expression.
Expression ... |
Finds ... |
To choose any character from many
A string of characters enclosed in square brackets, [ ], finds any one character in that string. If the first character in the brackets is a caret (^), it finds any character except those in the string
Expression ... |
Finds ... |
A minus sign (-) within square brackets indicates a range of consecutive ASCII characters. For example, [0-9] is the same as [0123456789]. The minus sign loses its special meaning if it is the first character (after an initial caret, if any) or last character in the string.
If a right square bracket is immediately after a left square bracket, it does not terminate the string; however, it is considered to be one of the characters to match. If any special character--such as the backslash (\), asterisk (*), or plus sign (+)--is immediately after the left square bracket, it does not have its special meaning and is considered to be one of the characters to match.
Expression ... |
Finds ... |
To find the beginning or end of a line
- You can specify that a regular expression finds only the beginning or end of the line.
- If a caret (^) is at the beginning of the entire regular expression, it finds the beginning of the line.
- If a dollar sign ($) is at the end of the entire expression, it finds the end of the line.
- If an entire expression is enclosed by a caret and
dollar sign (for example, ^the end$), it finds an entire line.
Expression...
Finds...
To re-use a regular expression in the Replace field
Tango extends the regular expression functionality and allows you to remember and recall a part of a regular expression. Enclose the part to remember with parentheses. To recall it, use \n, where n is a digit that specifies which expression in parentheses to recall. Determine n by counting occurrences of "(" from the left. You can only use this feature in the Replace field of the dialog box.
![]() Tip: For more information on
constructing POSIX regular expressions, ask your local UNIX guru, consult the
FreeBSD regex man page, or try doing an Internet search for the term
"POSIX 1003.2".
Tip: For more information on
constructing POSIX regular expressions, ask your local UNIX guru, consult the
FreeBSD regex man page, or try doing an Internet search for the term
"POSIX 1003.2".
Keyboard Shortcuts
The keyboard shortcuts, as they appear in Tango Editor menus, are as follows
Windows Menu Shortcuts
To view the Workspace, Actions palette, or Attributes palette, use the Windows menu commands.
For example, to view the Actions palette, either
choose Actions Palette from the Windows menu,
or press ![]() +2. If the palette is already visible, choosing the command or
pressing the shortcut hides it.
+2. If the palette is already visible, choosing the command or
pressing the shortcut hides it.
The Cycle Workspace command enables
you to move consecutively from one Workspace window to the next. For example,
if you are currently viewing the Project Workspace, pressing
![]() +` (the
single back quote character located to the left of the "1" key on
most keyboards), or choosing Cycle Workspace from the
Windows menu shows you the Data Sources Workspace. If you are
currently viewing the Snippets Workspace, pressing
+` (the
single back quote character located to the left of the "1" key on
most keyboards), or choosing Cycle Workspace from the
Windows menu shows you the Data Sources Workspace. If you are
currently viewing the Snippets Workspace, pressing
![]() +` or
choosing Cycle Workspace shows you the Project Workspace.
+` or
choosing Cycle Workspace shows you the Project Workspace.
Expanding and Collapsing Parent Objects
When working in the Project, Data Sources, Snippets, or Object Workspaces, or in the application file window, you can expand and collapse any parent object by one level using the left and right keyboard cursor keys.
A parent object is any object denoted in the view by the disclosure triangles: expandable, and collapsible.
- To expand the selected parent one level, press -> (right cursor key).
- To collapse the selected parent one level, press <-(left cursor key).
You can also use keyboard shortcut keys in an open application file window to expand and collapse the parent object through all levels at one time.
Using Tango Application Files
A Tango application file (or simply, application file) provides a powerful and flexible means for you to construct dynamic applications that run on your Web server and that interact with databases, other applications, and users running Web browsers. They are like programs or scripts in that they determine what operations Tango Server performs. Tango Server provides the brains, but it does nothing without the specific instructions you provide in the form of application files.
You add actions to an application file. When Tango Server runs the application file, it generates the HTML that is used by the Web browser to display the forms required to allow interaction with databases and other applications.
You can use the Search Builder and New Record Builder to have Tango Editor build search and insert record applications for you.
An application file is a file containing a series of Tango actions that, when executed by Tango Server, generates HTML and controls interaction with databases and other applications.
(You can also create Tango class files, which are reusable software components that you can incorporate in Tango application files. For more information, see "Tango Class Files"..)
XML Format
Tango application files and Tango class files are stored in an Extensible Markup Language (XML) format, which means they are structured text based on a specific document type definition. This is a substantial change from the binary formats of files in previous versions of Tango.
What is XML?
XML is a text-based and widely-endorsed standard markup language, similar to HTML, but much more flexible and robust. It is a subset of SGML (Standard Generalized Markup Language), an ISO standard. Its goal is to enable generic SGML (that is, structured documents) to be served, received, and processed on the Web in the way that is now possible with HTML. XML has been designed for ease of implementation and for interoperability with both SGML and HTML.
For details about the XML file format, see www.w3.org/xml/.
Tango XML file formats give Tango users the following advantages:
- XML files are human-readable.
- Text-processing tools can be used on Tango application files to perform file differences, complex searches involving regular expressions, and so on.
- The Tango XML file format is now public and exactly specified, so other applications can create Tango application files and Tango class files.
SGML and XML specifications require a document type definition (DTD). The DTD defines the structure of the various elements that make up an XML document and ensures that all applications that read and write it do so in a consistent way. It is, in effect, the schema of the document.
For more information about document type definitions and how to read them, see www.oasis-open.org/ cover/sgml-xml.html.
The Tango DTD for Tango application files and Tango class files is specified by the file tango.dtd. This file is located in the XML folder inside the folder where Tango is installed (by default, this is in the Tango 2000 folder).
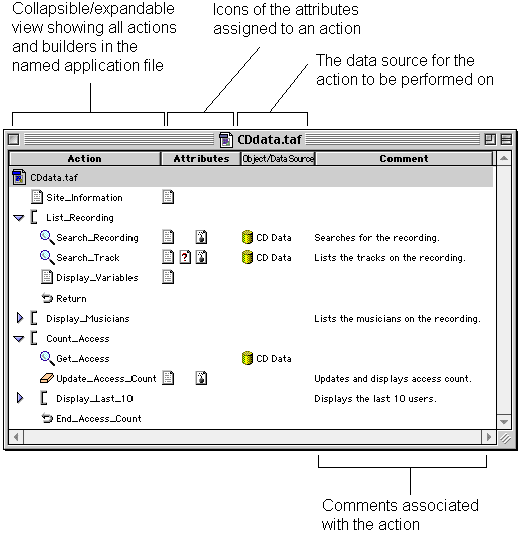
Application File Window
In Tango Editor, whenever you open an application file, the Tango application file window (or simply, application file window) shows you the following information:
- action icons and names, including those for builders, in the order Tango Server executes them (unless a control action redirects the flow of the execution)
- attributes assigned to an action, if any
- data sources for all database actions
- any associated comments.
The application file window also includes icons for attributes, objects, and data sources. The following diagram shows a typical application file window and its components:
Unsaved Changes Indicator
Whenever you change a Tango application file or class file, and the file has not been saved, an asterisk appears beside the file name in the title bar of the window and beside the filename in the window. This is called a dirty (unsaved changes) indicator.
Once you save the application file, these indicators disappear.
Creating an Application File
To create a new application file
An untitled application file opens.
Saving an Application File
To save an application file
- From the File menu, choose
Save.
If the application file has never been saved, the Save As dialog box appears.
If it has been saved previously, Tango Editor saves it using the existing name and location.
- Navigate to the desired location for the application
file.
For Tango Server to execute the application file, it must be located in or below the Web server's document root folder.
- Name the Tango application file.
- Tango application file names end in .taf.
This is the standard suffix used to identify files that Tango Server should
execute. Tango automatically adds the.taf suffix. With the plug-in,
this extension is required. With the CGI version of Tango Server and a
suffix-mapping you set up yourself, you may use any extension you like. Click
Save.
Tip: To save all open
Tango application and text files with their current name and location, choose
Save all from the File menu, or click the
Save All icon on the Tango Toolbar. The Save As dialog box
appears for new, unnamed files.
Saving a Tango Application File or Tango Class File as Run-Only
Run-only Tango application files and Tango class files can be executed by Tango Server, but they cannot be opened by Tango Editor.
Saving an application file or Tango class file as run-only allows you to create and distribute packaged Tango solutions while preventing users from editing the actual application file.
Run-only application files and Tango class files are executed and referenced by Tango Server in the same way as editable files. Saving an application file or Tango class file as run-only does not make its execution any faster.
![]() Caution: You cannot edit a
run-only copy of an application file or Tango class file, and there is no way
to make a run-only file editable. Make sure you keep an editable copy of any
run-only file.
Caution: You cannot edit a
run-only copy of an application file or Tango class file, and there is no way
to make a run-only file editable. Make sure you keep an editable copy of any
run-only file.
To make an application file or Tango class file run-only
- With an application file open in Tango Editor,
choose Save As Run-Only from the File menu.
The Save As dialog box appears.
You are saving a copy of your Tango application file or Tango class file as run-only. Your original application file or Tango class file is not changed.
- Name the run-only Tango application file or Tango
class file.
Tip: You may want to give the
run-only versions of your files a special name to identify their type, such as
CustomersRO.taf or CustomerRO.tcf, where
"RO" represents run-only.
- Click Save.
A run-only version of the application file or Tango class file is saved in the location you specified.
![]() Note: If you are distributing
your Tango solution, your customers need to purchase Tango Server.
Alternatively, you can license Tango Server for distribution with your
solution. Contact Sales at Pervasive for more information.
Note: If you are distributing
your Tango solution, your customers need to purchase Tango Server.
Alternatively, you can license Tango Server for distribution with your
solution. Contact Sales at Pervasive for more information.
Debugging Files
Setting the debug mode in Tango Editor lets you see useful information about your application file or Tango class file execution in your Web browser application.
To set debug mode
- Open the application file or Tango class file you want debug information on.
- Do one of the following:
- From the Attributes menu, select
Debug File.
A check mark beside the command indicates the debug mode is on.
- control+click the application file window, and select Debug File from the contextual menu that appears.
- From the Windows menu, choose Properties. Then enable Debug Mode in the Application File Properties dialog box that appears.
- Type
+D.
- From the Attributes menu, select
Debug File.
A debug icon appears beside the application file icon when Debug File is checked.
When you execute the application file, debugging information appears at the bottom of the results returned. The debugging information shows information such as:
You can force debugging for all application files and Tango class files by changing the debugMode system configuration variable using the Tango 2000 Configuration Manager (config.taf). See "Configuring Tango Server" for more details on configuring Tango Server.
Executing Application Files
Application files are executed in the same way HTML files are viewed--by specifying the name of the file in a URL. For example:
http://www.example.com/shop/additem.taf
This example executes an application file called additem.taf, located in the shop folder on the server www.example.com. If you are using the Tango CGI, you may need to include the Tango CGI in your URL, for example:
http://www.example.com/Tango2000.acgi$/additem.taf
You can pass parameters to the application file by using search arguments. These are name-value pairs appearing after a question mark in the URL. For example:
http://www.example.com/shop/additem.taf?item_num=80
In this example, the item_num search argument has a value of "80".
For more information, see "Assigning Variables With the Assign Action".
There are other ways of passing values to Tango application files. Form fields (post arguments) and cookies are two examples.
Converting to Tango 2000 Format
The Tango 2000 Editor can open Tango application files created with version 3.x or earlier of Tango and converts them to Tango 2000 (XML) format. The file is not saved in XML format until you choose the Save command.
Tango 2000 Server runs Tango 3.x and Tango 2000 application files, but does not run Tango 2.x query documents: they must be converted to Tango 2000 format.
![]() Caution: If you convert your
Tango application files to Tango 2000 (XML) format, they will not run
on Tango Server 3.x, nor can they be opened by Tango Editor
3.x. It is strongly recommended that you back up any files before
converting.
Caution: If you convert your
Tango application files to Tango 2000 (XML) format, they will not run
on Tango Server 3.x, nor can they be opened by Tango Editor
3.x. It is strongly recommended that you back up any files before
converting.
If you open a Tango 3.x project, all Tango 3.x application files in that project are automatically converted to Tango 2000 (XML) format.
Opening Tango 3.x Application Files
It is strongly recommended that you back up all your Tango 3.x application files before converting them to Tango 2000 (XML) format.
If you attempt to open a Tango 3.x application file with Tango 2000 Editor, a warning dialog box appears.
Clicking OK opens the file. The file is not saved in XML format until you choose the Save command.
The Tango 2000 XML file has exactly the same structure and features as a Tango 3.x binary application file: no data is lost in the conversion.
XML Conversion Drag-and-Drop Utility
A drag-and-drop utility, TAF Converter, that converts Tango 3.x (binary) application files to Tango 2000 XML files, is distributed with Tango 2000 to help you convert your application files without having to open them individually in Tango Editor. TAF Converter is located in the XML folder under your Tango2000 folder.
To convert Tango 3 format files to Tango 2000 application files
- Drag multiple Tango application files, folders, and/or drive icons over the TAF Converter icon. Folders and drives are scanned recursively for any Tango application files that they contain.
- Double-click the TAF Converter icon. An Open dialog box appears. Choose a Tango application file to convert.
During conversion, a progress bar appears. Click Cancel on the progress bar to cancel the operation.
A dialog box appears when conversion is successful.
When conversion is successful, TAF Converter creates a Tango 2000 format file and appends the extension .old to the Tango 3 format application file. For example, converting Tango 3 application file example.taf produces a Tango 2000 application file, example.taf, and a back-up copy of the Tango 3 format file, example.taf.old.