Using Projects
The Basics of Tango Projects
A project is a logical grouping of folders and files. Projects allow you to organize your work in terms of like-sets of files, including application, HTML, and text files--in fact, for any type of file. Projects exist in Tango Editor only and do not interact with Tango Server.
This chapter covers the following topics:
- Working with Tango projects
- adding and removing project files and folders
- project dependencies
- opening Tango 3.x projects
- deploying and downloading Tango projects via FTP
- application-specific Tango (AST) signatures for projects.
Working With Tango Projects
When you create a new project or open an existing project, the Project Workspace (Project section of the Workspace) displays the project name and the folders included in the project. The project name is the file name you assigned to the project.
The Project Workspace allows you to work with all files, data sources, objects, and resources associated with your Tango project without having to switch tabs in the Workspace.
The following five folders are always displayed at the root level in the Project Workspace and cannot be deleted:
For more information, see "Working With Presentation Pages".
For more information, see "Working With Project Data Sources".
- Sites
This folder lists the FTP (file transfer protocol) sites associated with the current project for the deployment of project files.
Project Root Properties
The Project Root Properties dialog box allows you to view information about your project.
To display the Project Root Properties dialog box
- From the Windows menu, choose Properties.
- Control+click the item, and choose Properties from the contextual menu that appears.
For more information, see "Modifying a Project's AST Signature".
- Advanced
This section allows you to enter an AST signature for the project by clicking the Modify button beside AST Signature.
Performing Project Operations
The project file contains information on the project, including a listing of the project's folders and files (in the Files folder).
![]() Note: The project file is a
listing to help you manage your projects; it does not contain the actual
project files.
Note: The project file is a
listing to help you manage your projects; it does not contain the actual
project files.
You perform operations on the project file separately from the folders and files it contains; that is, deleting a file from the project removes it from the project file, but does not actually delete the file.
![]() Note: Path names of files
stored in the project file are stored relative to the project file's location;
that is, if you move the project file, the files within it will not be found.
Note: Path names of files
stored in the project file are stored relative to the project file's location;
that is, if you move the project file, the files within it will not be found.
Project Workspace
For more information on setting Tango Editor preferences, see "Setting Preferences".
You can open any file appearing in the Project Workspace simply by double-clicking the file name. Tango application files and class files automatically open in Tango Editor. HTML and text files open in either Tango Editor, an application you select, or the application they were created with, depending on your preferences. Other types of files, such as graphic files, open automatically in the application they were created with.
You can also conveniently execute certain project commands directly in the Workspace. Control+clicking a project, folder, or file displays a menu of project, folder, and file commands and Workspace window commands.
Finding and Replacing in Projects
For more information, see "Finding and Replacing Text".
One of the powerful editing features of Tango is its ability to find and replace character strings in all files--Tango application files, Tango class files, HTML, and text--of a project. The project must be open for the find-and-replace operation to take place in the applicable files of the project; all non-text files are ignored. If Tango finds the specified text string, it automatically opens an editing window showing the corresponding file or HTML attribute for an application file.
Moving Files and Folders in the Project Workspace
You can move folders and files within the Project Workspace by dragging them to a new location within the Files folder.
Dragging a file to a folder adds that file to the target folder. Dragging a folder to another folder makes it--and any files in it--a subfolder of the target folder.
Creating a New Project
To create a new project
- From the Project menu, choose New.
- Specify a project file name and location.
 Note: If you are developing
Tango applications in a mixed development environment consisting of both Tango
on Macintosh and on Windows, it is recommended that you add .tep to
the project file name (for example, MyProject.tep). This is the
extension a Windows machine needs to recognize the file as a Tango project
file.
Note: If you are developing
Tango applications in a mixed development environment consisting of both Tango
on Macintosh and on Windows, it is recommended that you add .tep to
the project file name (for example, MyProject.tep). This is the
extension a Windows machine needs to recognize the file as a Tango project
file.
- Click Save.
Adding a Folder to a Project
You can add a new folder to the Files folder or Presentation Pages folder of a project. You can also add an existing folder to the Files folder. You cannot add a folder to the other Project folders.
To add a new folder to the Files folder or Presentation Pages folder
- Select the Files folder or Presentation Pages folder.
- Do one of the following:
- From the Project menu, choose New Folder.
- Control+click the Files or Presentation Pages folder of the project, and choose New Folder from the contextual menu that appears.
When you add a new folder, the name untitled appears under the Presentation Pages or Files folder. Tango may add a suffix to the default name (for example, untitled 2) to make the name unique. A folder name must be unique at the level you are adding the folder.
To add an existing folder to the Files folder
![]() Note: You cannot drag a folder
from the Macintosh Finder into the Presentation Pages folder or any of its
subfolders.
Note: You cannot drag a folder
from the Macintosh Finder into the Presentation Pages folder or any of its
subfolders.
All the subfolders and files within this existing folder are added to the project at the specified location.
A folder name must be unique at the level you are adding the folder; rename a folder if necessary.
To rename a project folder
- Click the name of the folder; click the name again.
- Control+click the folder icon or name and choose Rename from the contextual menu that appears.
Adding Files to a Project
You can add files to the Files folder from the Macintosh Finder.
For more information, see "Working With Presentation Pages".
You cannot add files to the Presentation Pages folder from the Macintosh Finder; however, you can designate certain files in the Files folder as presentation pages.
Filenames appear alphabetically in the Files folder. The order of application files in this folder has no bearing on the order that Tango Server executes them.
To add files to the Files folder or its subfolder
- Select the Files folder or one of its subfolders.
- Do one of the following:
- The Add Files into Project dialog box appears.
Select the files you want to add to the project and click Open.
- The added files appear in the Files folder or its subfolder.
Removing Files and Folders From a Project
You can remove files and folders from the Files folder. When you remove a folder, you remove it along with all its subfolders and files.
Removing a file from a project does not delete the file. The file remains intact so you can use it again or add it to another project.
To remove files and folders from a project
- Select the files or folder you want to remove.
- Do one of the following:
- From the Project menu, choose Remove Items.
- Press Delete.
- Control+click the file or folder, and choose Remove from the contextual menu that appears.
A message appears, asking you to confirm that you want to remove the selected item(s).
- Click OK.
Opening and Closing a Project
To open an existing project
Only one project can be open at a time. If another project is already open, Tango closes it and then opens the selected project. Any changes that you made to the project being closed are automatically saved.
When you open a project, the last view state is restored; that is, folders appear expanded or collapsed as they did previously.
To close an open project
Any changes you make to an open project are automatically saved as you make them.
Editing HTML and Text Files
In addition to Tango application files and Tango class files, a project file can include any other type of file. For HTML and text files, Tango has built-in editing capabilities. (See "HTML Editing Window".)
For more information on setting Tango Editor preferences, see "Setting Preferences".
You can choose to edit HTML and text files in Tango Editor, or in another application. Select the application you want to use to open HTML and text files in the Preferences dialog box.
If a project is open when you save an HTML or text file in Tango, you are automatically asked if you want to add the file to the current project. Click Yes to add the file to the project root or No to cancel.
Working With Project Dependencies
Dependencies are those data sources and objects that are used or referenced by Tango application files and Tango class files in the project. Tango Editor shows the data source and object dependencies of your project, warns you of unresolved dependencies (if enabled), and helps you resolve them.
To enable unresolved dependency notification
- From the Edit menu, choose Preferences.
- Select the General tab and check
Warn me about unresolved data sources and objects.
When Tango Editor detects an unresolved dependency (for example, when Tango Editor tries to expand an unresolved item or open an action that uses an unresolved item for the first time), a dialog box appears.
An unresolved dependency has a grayed-out icon. Click OK to close the Unresolved Dependencies dialog box.
To resolve a dependency
- In the Project Workspace, control+click the unresolved item and choose Resource Dependency... from the contextual menu that appears.
- Do one of the following:
- For a data source, Tango prompts you to resolve the
dependency. Clicking Yes opens the Create New Data Source
dialog box for the type of data source requiring resolution.
For information on creating a new ODBC or Oracle data source, see "Creating a Data Source"
- For a JavaBean or Tango class file, Tango prompts you to locate the object. Clicking Yes opens a File Open dialog box. Navigate to the unresolved item and click Open.
Working With Project Application Files
The Files folder displays all the files used or referenced by your project. You can organize files by creating new folders and moving files to appropriate folders within the Files folder.
Project Application File Properties
The project Application File Properties dialog box allows you to view information about a selected application file. The Application File Properties dialog box displays four tabs for a Tango application file in a project.
For more information, see"Modifying a Project's AST Signature".
- Advanced
This section allows you to enter an AST signature for the application file in the AST Signature field.
![]() Caution: An AST signature
assigned to a project application file's advanced properties will be
overwritten by changes to the project's AST signature.
Caution: An AST signature
assigned to a project application file's advanced properties will be
overwritten by changes to the project's AST signature.
Working With Presentation Pages
The Presentation Pages folder separates presentation pages from Tango application files, Tango class files and other HTML, graphic or text files in the project, allows page-based editing, and makes these files available to the interface of the Presentation action.
When you assign files to this folder, they are designated as presentation pages, but also remain listed in the Files folder or its subfolders.
For more information about the Presentation action, see "Presentation Action".
To mark an HTML or text file as a presentation page
- Control+click on an HTML or text file in the Files folder of the Project Workspace, and choose Properties from the contextual menu that appears. The File Properties dialog box appears.
- Control+click on an HTML or text file within the
Files folder of the Project Workspace, and choose
Presentation Page from the contextual menu that appears.
A check mark appears next to Presentation Page.
Marking a file as a presentation page adds it to the Presentation Pages folder.
- Select an HTML or text file in the Files folder of the Project Workspace, and drag it to the Presentation Pages folder.
To remove a file from the Presentation Pages folder
- Control+click on a file in the
Files folder of the Project Workspace, and choose
Properties from the contextual menu that appears.
Uncheck the Presentation Page checkbox in the File Properties dialog box that appears.
- Control+click on a file within the Files folder of the Project Workspace, and deselect Presentation Page from the contextual menu that appears.
- Drag a file out of the Presentation Pages folder.
Working With Project Data Sources
The Data Sources folder contains an alphabetically-sorted list of data sources that are used in your project. Unresolved dependencies are identified by grayed-out icons. This folder cannot be modified directly.
For more information about data sources, see"About Data Sources".
Working With Project Objects
The Project Objects folder contains an alphabetically-sorted list of objects that are used in your project. Unresolved dependencies are identified by grayed-out icons. This folder cannot be modified directly.
For more information about objects, see "Understanding Objects in Tango".
Working With Project FTP Sites
The Sites folder lists the FTP (file transfer protocol) sites associated with the current project for the deployment of project files. You associate an FTP site with your project by defining a site in the Define Sites dialog box and adding it to your project.
To view details about a particular site, control+click on a site icon in the Project Workspace, and choose Properties from the contextual menu that appears.
For more information about FTP sites, see "Deploying and Downloading Tango Projects via FTP".
Opening Tango 3.x Projects
For more information, see"XML Format".
Opening a Tango 3.x project file in Tango 2000 automatically converts the project file and all the application files that it references to Tango 2000 format.
For more information, see "Converting to Tango 2000 Format".
The project file format is different in Tango 2000. Tango 3.x will not be able to open your Tango 2000 project files. It is strongly recommended that you back up all your Tango 3.x project and application files before converting them to Tango 2000 (XML) format.
If you attempt to open a Tango 3.x project file with the Tango 2000 Editor, a warning dialog box appears.
Clicking Convert opens the project file in Tango 2000 Editor and converts all of the referenced Tango application files to Tango 2000 format. Clicking Cancel cancels the operation.
![]() Caution: When opening project
files, the conversion and resaving in XML format of associated Tango
application files happens immediately when you click
Convert in the Convert Project dialog box.
Caution: When opening project
files, the conversion and resaving in XML format of associated Tango
application files happens immediately when you click
Convert in the Convert Project dialog box.
If Tango Editor cannot find or save one of the files referred to by the Tango project, an error message appears, informing you of the problem.
Deploying and Downloading Tango Projects via FTP
FTP (file transfer protocol) is a standard method for transferring files between machines on the Internet. FTP allows a client machine to log in to a server machine to send or retrieve files.
Within a Tango project, you can define an FTP site and deploy (upload) files defined in your project to that site, preserving the hierarchical structure of your project files. You can also download files from a remote site to replicate a project or share projects with other developers.
The Sites folder in the Project Workspace allows you to associate FTP sites with your project and deploy files to one or several FTP sites.
The project file stores a project's site definitions and details about each site, so that a project can be shared among users or team members.
Passive Mode FTP
Tango allows you to deploy and download files via passive mode FTP (PASV-FTP). PASV-FTP allows you to initiate a data connection to the FTP server; without passive mode, connection is initiated by the FTP server. To transfer files via PASV-FTP, check the Passive Mode checkbox on the Project Site Properties dialog box.
![]() Note: Enabling PASV-FTP may be
necessary with some firewalls. Check with your system's administrator.
Note: Enabling PASV-FTP may be
necessary with some firewalls. Check with your system's administrator.
Deploying and Downloading Projects
Once you define an FTP site and add it to your project, you can deploy your project to a remote FTP site to share with other developers. When you deploy your project, its sub-directories are replicated as necessary on the FTP site. You can also download files from a remote FTP site and automatically add them to your Tango project.
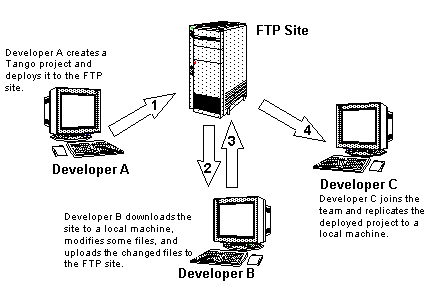
Deploying and downloading project files can be useful in a development environment. For example, remote developers could join a development team and automatically create a working version of the Tango Web site.
The following diagram shows how projects can be shared among developers once an FTP site has been established.
Defining an FTP Site
You define and update details about FTP sites from the Define Sites dialog box.
To define or update an FTP site in the Define Sites list
- From the Edit menu, choose Define Sites....
- Do one of the following:
- Click New to define an FTP site.
- Select an existing site and click Update to modify the site's definitions.
- Select an existing site and click Delete to remove the site.
If you clicked New or Update, the Site Properties dialog box appears.
Define or update an FTP site by entering or modifying your information in the following fields:
Site Name. Enter a name for the site. This name will be displayed in the Project Workspace. FTP site names must be unique in the Define Sites list. FTP sites listed in the Define Sites list can be used by any number of projects.
User name. Enter the name required to gain FTP access to the site.
Password. Enter the password needed to gain FTP access to the site. You must check the Save Password checkbox before you can enter a password.
If the Save Password checkbox is unchecked, Tango prompts each session for a user name and password the first time an FTP command is executed for that site.
For more information, see "Deploying and Downloading Projects".
Directory. Enter the FTP site directory you want to access for FTP deployment and downloading. This directory mirrors the Files folder in the Project Workspace when project files are deployed. If you leave this field empty, the FTP site root directory is used as the base directory.
Adding an FTP Site to Your Project
You choose an FTP site from the Define Sites list and add it to the Sites folder in the Project Workspace to associate a site with your project for deployment and downloading.
![]() Note: Once you add an FTP site
to your project, any changes made to the Site Properties through the Define
Sites list are not reflected in the Project Site Properties. You must edit the
site's properties in the Project Site Properties dialog box from the Project
Workspace, or delete and re-add the site to the project.
Note: Once you add an FTP site
to your project, any changes made to the Site Properties through the Define
Sites list are not reflected in the Project Site Properties. You must edit the
site's properties in the Project Site Properties dialog box from the Project
Workspace, or delete and re-add the site to the project.
To add an FTP site to your project
- From the Project menu, choose Add Site....
- Control+click on the project icon or name, and choose Add Site... from the contextual menu that appears.
The Choose a Site dialog box appears, allowing you to choose a defined site. An FTP site must exist before you can assign it to a project.
The first site added to a project becomes the default site for use with the Deploy and Download commands. You can change the default only when more than one site is assigned to your project.
To change the default site for deployment or download
- From the Sites folder, control+click the site you want, and choose Default Site from the contextual menu that appears.
To view or edit properties of a project site
- From the Sites folder, select the site you want; from the Windows menu, choose Properties.
- From the Sites folder, control+click the site you want, and choose Properties from the contextual menu that appears.
The Site Properties dialog box appears, displaying the definitions of this site.
Deploying Files or Folders
You can deploy (upload) any project to a remote site via FTP using the Deploy and Deploy to... commands.
The file and folder hierarchy of a project is preserved during deployment. Tango replicates the folder structure onto the remote site and creates directories, if they do not already exist on the FTP server.
To deploy to your project's default site
- Do one of the following:
- From the Project Workspace, select the file or folder you want to deploy; from the Project menu, choose Deploy.
- Control+click in the Project Workspace on the file or folder to be deployed and choose Deploy from the contextual menu that appears.
A dialog box appears, warning you that files with the same names will be replaced.
 Caution: If you deploy a file
to a directory on the server where a file with the same name exists, the file
in the deployment directory is overwritten with the new file.
Caution: If you deploy a file
to a directory on the server where a file with the same name exists, the file
in the deployment directory is overwritten with the new file.
- Click Yes to transfer the files to
your project's default site.
The FTP File Transfer dialog box appears. You can stop the transfer and close this dialog by clicking Stop. The dialog box goes away when the transfer is complete.
 Tip: You can control automatic
dismissal of the File Transfer dialog box by choosing
Preferences... from the Edit menu and
enabling or disabling Close file transfer progress dialog when
operation completes.
Tip: You can control automatic
dismissal of the File Transfer dialog box by choosing
Preferences... from the Edit menu and
enabling or disabling Close file transfer progress dialog when
operation completes.
To deploy to another site associated with your project
You can also click on the file or folder to be deployed in the Project Workspace and drag it over the name or icon of the FTP site.
- Do one of the following:
- Select a site and click OK.
A dialog box appears, warning you that files with the same names will be replaced.
Caution: If you deploy a file
to a directory on the server where a file with the same name exists, the file
in the deployment directory is overwritten with the new file.
- Click Yes to transfer the files to
the selected site.
The FTP File Transfer dialog box appears. You can stop the transfer and close this dialog by clicking Stop. The dialog box goes away when the transfer is complete.
Downloading From Remote Sites
Projects may also be created by downloading files and folders from a remote directory hierarchy via FTP, using the Download and Download from... commands.
Downloading a remote site replicates the contents of an FTP directory and its sub-directories onto your local machine.
To download from your project's default site
- Create a new project or open an existing project.
- If it is a new project, add to this project the site from which you want to download files. This site is the default site.
- Do one of the following:
A warning dialog box appears if any file to be downloaded has the same name as a file that exists in your project's download folder.
![]() Caution: If you click
OK in this dialog box, all downloaded files will
overwrite files with the same name that exist in the folder to which you are
transferring files on your machine.
Caution: If you click
OK in this dialog box, all downloaded files will
overwrite files with the same name that exist in the folder to which you are
transferring files on your machine.
The FTP File Transfer dialog box appears. You can stop the transfer and close this dialog by clicking Stop. The dialog box goes away when the transfer is complete.
If the download of any file is unsuccessful, a dialog box informs you of an error.
Clicking OK in the dialog box continues the download of files when more than one file is downloaded.
To download from another site associated with your project
- Open an existing project.
- If the site from which you want to download files is not yet associated with this project, add the site to this project.
- Do one of the following:
- Select a site and click OK.
A warning dialog box appears if any file to be downloaded has the same name as a file that exists in your project's download folder.
Caution: If you click
OK in this dialog box, all downloaded files will
overwrite files with the same name that exist in the folder to which you are
transferring files on your machine.
The FTP File Transfer dialog box appears. You can stop the transfer and close this dialog by clicking Stop. The dialog box goes away when the transfer is complete.
If the download of any file is unsuccessful, a dialog box informs you of an error.
Clicking OK in the dialog box continues the download of files when more than one file is downloaded.
Browsing a Project's FTP Site with a Web Browser
You can browse a project's FTP site and select files or folders to download through your Web browser.
To browse the default FTP site associated with your project
- Do one of the following:
- From the Project menu, choose Browse Site.
- Control+click the Sites folder in the Project Workspace, and choose Browse Site from the contextual menu that appears.
Your default Web browser launches with the URL for that FTP site.
- If you checked Save Password in the
Site Properties dialog box when you defined the FTP site, the URL contains your
user name and password for access to the FTP site; for example:
ftp://username:password@example/directory
If your user name and password are not specified in the Site Properties dialog box, some Web browsers prompts you for this information (for example, Netscape and IE5) or generates an error (for example, IE4).
Caution: The default behavior
of a Web browser is to display the username and password of the FTP site in
clear text in the URL. If you do not want the username or password to be seen
in the URL, and you are using Netscape Navigator or Microsoft Internet Explorer
as your Web browser, leave these fields blank in the Site Properties dialog
box. When you browse a site, the Web browser prompts you for this information.
When you download files through a Web browser, you must manually add the downloaded files to your Tango project.
To browse any FTP site associated with your project
- From the Sites folder, select the FTP site you want to browse.
- Follow the instructions given in To browse the default FTP site associated with your project.
Application-Specific Tango (AST) Signatures for Projects
Application-specific Tango Servers are available if you want to develop a Tango application and distribute it with a Tango Server as an all-in-one solution. This allows your end-user to execute your solution without having to purchase a Tango Server for your single application.
The AST Server works only with the Tango application files in the licensed application with the assigned AST signature. You must add this signature to all Tango application files used in the application in order for them to be executed by the AST Server. Tango application files without an AST signature, or with a different AST signature, do not work with the AST Server.
Contact Pervasive sales for information on purchasing an AST license for your application.
Modifying a Project's AST Signature
An application file may belong to more than one project, but it can have only one AST signature. An application file added to a project will lose any signature it previously had as a member of another project.
When you modify the AST signature for a project, the project AST signature is assigned to all application files within that project. Application files added to a project are automatically assigned the AST signature of the project. If the project's AST signature has not been assigned, the application file's existing AST signature, if present, is cleared.
To modify a project's AST signature
- Do one of the following:
- From the Project menu, choose Modify Project AST Signature....
- Control+click the project name in the Project Workspace, and choose Modify Project AST Signature... from the contextual menu that appears.
- Control+click the project name, choose Properties, and click Advanced tab to display advanced properties. Click Modify....
- Enter the project's new AST signature in the
AST Signature field.
Valid AST signatures are three characters long and may contain the characters A to Z (excluding I and O) and the digits 0 to 9.
- Click OK to save the signature in
the project and in every application file associated with the project.
Tango warns you if an application file in the project is open when you try to modify the project's AST signature.
- Click OK to update and save all
project application files (including open application files).
If one or more application files in a project cannot be opened or saved (for example, files no longer exist or have "read-only" permission), Tango Editor displays a warning dialog box.
If this occurs, correct the problem and repeat the steps, starting from step 1.