Using Objects
Incorporating Objects in Application Files
You use objects in Tango by adding Create Object Instance and Call Method actions to application files.
You can also use the <@CREATEOBJECT> and <@CALLMETHOD> meta tags to create and use object instances in Tango. This alternative is recommended for advanced users. For more information, see the Meta Tags and Configuration Variables manual.
The basic concepts of objects in Tango are covered in the previous chapter. This chapter focuses on the procedure and details of using objects.
The topics covered in this chapter include:
- preparing to use objects
- adding objects to the Objects Workspace
- viewing object information in the Objects Workspace
- creating object instances
- using the Create Object Instance action window
- calling methods
- using the Call Method action window
- using the Objects Loop action.
Preparing to Use Objects in Tango
Planning to Use an Object
Here are some issues to be aware of before using objects with Tango application files:
- Before you use an object in Tango, you have to know what the object can do for you, what the requirements of using the object are, and whether the object suits your Tango application file. You may have to consider several alternatives to select the object that is the best for your situation.
Read the documentation on the object, provided by the object vendor. Find out about the methods you can use with the object and the information on parameters. Understanding the parameters helps you set up your Tango application file in order to use the object effectively.
For more information, see "Object Types Supported in Tango".
Make sure the object you plan to use belongs to one of the types supported by Tango 2000: JavaBean or Tango class file.
Installing an Object
The following are some guidelines for installing objects before developing and deploying Tango application files:
It is best to install the objects you plan to use on your development machine. At least, these objects must be visible on the network from your machine.
Some objects already exist on your machine. If the object you need is not on the machine or visible on the network, you must install it first. Follow the instructions provided by the object vendor.
Local and Remote Machines
Tango also supports COM objects on the Windows platform. For more information, see the Tango 2000 User's Guide for Windows.
The different object types that Tango supports are JavaBeans and Tango class files.
In most cases, you use objects installed on the local machine (same machine as Tango Server). If your deployment machine is not the same as your development machine, you need to install the objects on both machines.
Depending on the object type, you may also be able to use objects installed on remote machines. When deciding which machine to use, consider load balancing and fault tolerance issues.
COM object (supported only on the Windows platform)
You can access and execute COM objects on both local and remote machines. Use the DCOM environment to deploy COM objects on remote machines.
-
Tango uses the JavaBean Search Path file, maintained by Tango, to locate JavaBeans.
When using Tango Editor, adding a JavaBean to the Objects Workspace prompts you to add the path to the JavaBean to the JavaBean Search Path file, if it is not already in the JavaBean Search Path file.
When using Tango Server, you must manually add the path to the .jar file to the JavaBean Search Path file, if it is not already in the JavaBean Search Path file on the Tango Server machine.
The JavaBean Search Path file is located in the Tango 2000 folder within the Preferences folder in your System Folder.
-
While you can access Tango class files on both local and remote machines, you are able to execute Tango class files only on the local machine.
For more information, see "Setting Search Paths for Tango Class Files" and "Objects".
For more information, see "TCFSearchPath" in the Meta Tags and Configuration Variables manual.
Overview of Using Objects in Tango
You use an object in Tango by adding Create Object Instance and Call Method actions associated with an object to your Tango application file or Tango class file. The procedure can be broken down into three steps.
The following steps allow you to use the graphical interface of Tango Editor to develop Tango application files with objects. Advanced Tango users may want to use Tango meta tags to create and use object instances. See the Meta Tags and Configuration Variables manual for details.
Step 1: Add Objects to the Objects Workspace
For more information, see "Adding an Object to the Objects Workspace".
You can only use objects that are visible in the Objects Workspace. If the objects you want to use are not there, you have to add them first.
For more information, see "Viewing Object Information in the Objects Workspace".
![]() Note: Tango allows you to view
object information in the Objects Workspace, if the objects have already been
added to the Objects Workspace.
Note: Tango allows you to view
object information in the Objects Workspace, if the objects have already been
added to the Objects Workspace.
Step 2: Add Create Object Instance Actions
Tango does not use the objects you see in the Objects Workspace directly; it uses instances created from these objects. The instances created from these objects are called "object instances", or simply "objects".
For more information, see "Using Available Object Instances".
Before you can call a method involving an object in a Tango application file or Tango class file, an object instance must be available.
For more information, see "Adding a Create Object Instance Action".
Depending on the circumstances, you may have to create an object instance with a Create Object Instance action.
Step 3: Add Call Method Actions
Once an object instance is available, you can incorporate its methods into your Tango application file or Tango class file by adding Call Method actions associated with this object.
Adding an Object to the Objects Workspace
If the Workspace is not visible on your screen, choose Workspace from the Windows menu.
To view the Objects Workspace, click the Objects tab in the Workspace.
JavaBeans in the Objects Workspace
To add a JavaBean to the Objects Workspace
Locate the Java archive files (.jar) and select the file you want to use. Click Open.
A dialog box where you can select JavaBeans and Java Classes appears.
The dialog box displays all the JavaBeans found in the Java archive file. You can add one or more JavaBeans from this archive file.
You can also choose to display and add all Java Classes in the .jar file by selecting All Java Classes from the pop-up menu. If you just want to display JavaBeans, select JavaBeans.
Select one or more JavaBeans from the list. (To select more than one object simultaneously, press
 or
Shift.) Click OK.
or
Shift.) Click OK. In the Objects Workspace, the name(s) of the JavaBean(s) you have added appears under the JavaBeans object type. The JavaBeans that belong to the same Java archive file (.jar) are contained in a folder bearing the name of that Java archive file.
![]() Note: Tango Editor uses the
JavaBean Search Path file maintained by Tango for locating JavaBeans.
If the path to that JavaBean does not already exist, Tango Editor prompts you
to add the path to JavaBean Search Path. Click Yes to
add the path.
Note: Tango Editor uses the
JavaBean Search Path file maintained by Tango for locating JavaBeans.
If the path to that JavaBean does not already exist, Tango Editor prompts you
to add the path to JavaBean Search Path. Click Yes to
add the path.
Tango Class Files in the Objects Workspace
To add a Tango class file to the Objects Workspace
Locate the Tango class files (.tcf) in the dialog box and select one or more Tango class files from the list. (To select more than one object simultaneously, press
or
Shift.) Click Open. In the Objects Workspace, the name(s) of the Tango class file(s) you have added appears under the Tango Class Files object type.
Removing an Object From the Objects Workspace
If there are objects in the Objects Workspace that you do not need, you can remove them.
When you remove an object from the Objects Workspace, you are not deleting the object from your machine, just from the Objects Workspace. You can easily add the object to the Objects Workspace again, when you need it.
If you have already incorporated an object in a Tango application file or a Tango class file, removing the object from the Objects Workspace does not affect the application file or the Tango class file.
To remove an object from the Objects Workspace
Select the object you want to remove. From the Object menu, choose Remove.
Control+click the object you want to remove, and choose Remove from the contextual menu that appears.
Viewing Object Information in the Objects Workspace
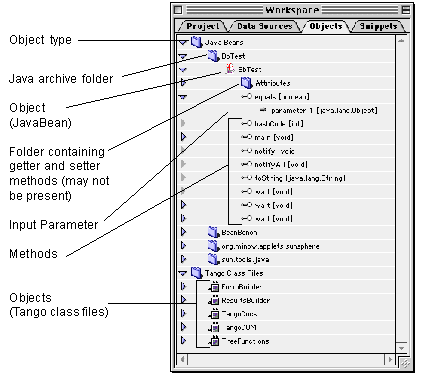
In the Objects Workspace, you can view information on objects by successively expanding items at each level. The information you get from the Objects Workspace includes the following:
Additional object information is available to you in the Object Properties window. For further information about objects, consult the documentation supplied by the respective object vendors.
The following is an example of the Objects Workspace with expanded items:
To view information on an object
In the Objects Workspace, click the disclosure triangle to the left of an object type to expand one of the two object types: JavaBeans, or Tango class files.
A list of all the objects available for the object type appears.
 Note: Different object vendors
tend to use different icons to represent their objects. Tango generally
displays these icons next to the respective object names.
Note: Different object vendors
tend to use different icons to represent their objects. Tango generally
displays these icons next to the respective object names.
Related objects may be grouped together in a folder. An example of such a folder is a Java archive file of JavaBeans.
Click the disclosure triangle to the left of an object to expand the object.
A list of all the methods available for the object appears.
Note: If the Attributes folder
exists under this object, click the disclosure triangle to see additional
methods in this folder. For more information, see
see "Attributes Folder"on
Attributes Folder.
Click the disclosure triangle to the left of a method to expand the method.
- If the method returns a result, the data type is indicated in brackets after the method name, for example, [text]; otherwise, it is indicated as [none] or [void].
Attributes Folder
In some cases, the Attributes folder appears under an object. This folder contains the getter and setter methods of the object.
The getter and setter methods let you get and set attributes (also known as properties or data members). Unlike most methods of an object, getter and setter methods are very simple methods:
-
A getter method returns the value of an attribute from the object. An example of this is GetBalance.
-
A setter method lets you set the value of an object attribute. An example of this is SetBalance.
![]() Note: If the object vendor
does not classify these methods as attributes, Tango does not place them in the
Attributes folder.
Note: If the object vendor
does not classify these methods as attributes, Tango does not place them in the
Attributes folder.
Object Properties
The Object Properties window displays a summary of the information about the object you select. You cannot change the information in this window.
![]() Note: Much information about
objects is available in the Objects Workspace. See
"Viewing Object Information in the Objects
Workspace".
Note: Much information about
objects is available in the Objects Workspace. See
"Viewing Object Information in the Objects
Workspace".
To view object properties
General
The General section of the Object Properties window displays the following information:
Details
The Details section of the Object Properties window displays attributes and their associated values. The attributes displayed in this section depend on the object type and the object. For a detailed description of the attributes, refer to the documentation from the object vendor.
Caching and Refreshing of Object Information
When you add an object to the Objects Workspace, Tango stores the introspection information about the object--including methods and parameters--in the Object Cache file in the Support Files folder within the Tango 2000 folder.
The cache offers you some advantages:
Because Tango stores the object and introspection information in the cache, it can access this information faster.
The cache allows you to work away from your network or in a location where objects are unavailable.
Developers of objects sometimes improve the design of their objects. If you want to update the object information in the cache, you can refresh the objects as follows:
![]() Note: Refreshing does not
update any actions that are already using the object(s).
Note: Refreshing does not
update any actions that are already using the object(s).
Adding a Create Object Instance Action
For more information, see "Adding an Object to the Objects Workspace"..
Before you add a Create Object Instance action to your Tango application file or Tango class file, make sure the object from which you want to create an object instance is available in the Objects Workspace.
A Create Object Instance action is a Tango action. The action icon is available on the Actions palette.
The procedure for adding a Create Object Instance action is the same whether you are working with a JavaBean or Tango class file.
To add a Create Object Instance action
Create or open the Tango application file or Tango class file in which you want to create an object instance.
Drag the Create Object Instance action icon from the Actions palette to the location you want in your application file or Tango class file.
The Create Object Instance action window appears. The field next to the Create Object Instance action icon displays a message: "Drag an object from the Workspace."
Click the Objects tab in the Workspace to view the Objects Workspace.
Expand one of the object types--JavaBeans or Tango class files--that you want to view, by clicking the disclosure triangle to the left of this object type.
Select the object from which you want to create an object instance and drag it to the Create Object Instance action window.
The Create Object Instance action window displays the name of the object. An example of the Create Object Instance action window is shown on Create Object Instance action window.
For more information, see "Completing the Create Object Instance Action".
- Complete the information in the Create
Object Instance action window.
Note: You can skip this step
for the time being. At a later time, open this action item and complete the
information.
Close the Create Object Instance action window.
A Create Object Instance action appears in your application file or Tango class file. The default name for the action is Create_Object_Instance.
If you want, you can change the default name to whatever is appropriate in your case.
Shortcut to Adding a Create Object Instance Action
An alternative approach to adding a Create Object Instance action from the Actions palette is to do it directly from the Objects Workspace. This procedure is a slight modification of the one described on Adding a Create Object Instance Action.
Skip the step involving the Create Object Instance action icon. Just drag the object you want to use from the Objects Workspace to the location you want in the application file or Tango class file.
Completing the Create Object Instance Action
The Create Object Instance action window contains important information about a Create Object Instance action. It allows you to view and edit this information.
You can open the Create Object Instance action window by doing one of the following:
For more information, see "Adding a Create Object Instance Action".
For more information, see "Shortcut to Adding a Create Object Instance Action".
dragging an object from the Objects Workspace to an application file
(when you create a new Create Object Instance action)double-clicking the name of a Create Object Instance action in your application file
(when you edit an existing Create Object Instance action).
The title of the Create Object Instance action window consists of the name of your Tango application file, followed by the name of the action, separated by a colon.
The default name of the Create Object Instance action is Create_Object_Instance. You can change it in the application file window.
There are several sections to the Create Object Instance action window: object name, object instance variable, instance, and expiry URL.
Object Name
This is the field next to the Create Object Instance action icon. The object name is the name of the object from which you create the object instance. If no object has been assigned to this action, the field displays the message Drag an object from the Workspace.
Object Instance Variable
This section sets the name and the scope of the variable that refers to the object instance once it is created.
Scope
You can select a scope from the pop-up menu, or enter a custom scope. The default is Local.
When you select a scope, consider how you plan to use the variable. For example, you are using the object instance to calculate interest based on principle and interest rate, and you want to get the balance later, in another application file. In this case, you should select the User scope instead of the Local scope, because the User scope makes the variable available beyond the execution of the current application file.
Name
Enter the variable name in this dialog box.
The name that you enter in this box becomes available in the pop-up menu in the Object Instance Variable section of Call Method action windows in the same Tango application file or Tango class file.
Instance
The options in this group are only available if you are editing Tango application files or Tango class files created on a Windows machine that use COM objects. COM objects are not available on the Macintosh platform, but you can still edit application files and class files that were created on Windows to use COM.
Create New Object
Create New Object is the default option. Tango Server creates a new instance of the object when the application file is executed. The new instance exists until the expiry time is reached--which is determined by the variable scope that you specify in the Object Instance Variable section--or until it is purged with a <@PURGE> meta tag.
Get Existing Object
In some special cases, you may want Tango to connect to an object instance that is already existing, instantiated by the operating system of your machine, independent of your Tango application file. If you are familiar with the way this process works and you want to use the object instance in this manner, you can make this selection.
Currently, Tango supports this feature only in COM objects. If you are using a JavaBean or a Tango class file, this selection is disabled.
If the object you specify is not registered properly as a global COM resource when Tango Server executes the Create Object Instance action, Tango Server generates an error.
Initialization String
This feature allows you to bring up COM objects in some initialized state, as implemented by the referenced moniker. (A referenced moniker is a term used with COM objects; it is essentially a string of characters in a special format for creating initialized COM objects. See your COM object documentation for details.) Specifying an initialized state can combine several actions into one, and thus save development time.
An example of using a referenced moniker is to specify an action based on a spreadsheet file. When Tango Server executes this initialized object instance, it opens the spreadsheet program and the spreadsheet file, lets the spreadsheet program perform its operations and returns the result to Tango.
Currently Tango supports the use of initialization string only in COM objects. If the instance you are creating is from a JavaBean or a Tango class file, the field is disabled.
You can do one of the following with the Initialization String text box:
-
Tango creates an uninitialized instance of the COM object (the object indicated in the Object Name field).
Enter the referenced moniker in the text box. (Refer to the documentation from your COM object vendor for the use of referenced monikers.)
Tango reads the initialization string to create an initialized instance; it ignores whatever COM object that you may have selected when you started the Create Object Instance action (that is, the object indicated in the Object Name field). The information you enter in the Object Instance Variable section applies to this initialized instance.
Username and Password
By default, a COM object uses the username and password of your Tango Service login.
However, you have the option to specify a different username and password for this COM object.
The Username and Password text boxes allow you to enter optional security information for this COM object. Both text boxes accept meta tags and are encrypted in the Tango application file or Tango class file. Username and password fields are limited to 128 characters.
Currently, Tango supports the use of username and password only in COM objects.
Expiry URL
When the object instance expires, Tango destroys the instance.
You can direct Tango Server to perform application-specific cleanup operations prior to the destruction of the instance. Enter either a valid URL or one or more meta tags that evaluate to a valid URL. The URL must be a complete HTTP URL that Tango Server can access. For example:
http://www.example.com/mycleanup.taf?object=myobject
Adding a Call Method Action
Before you add a Call Method action to your Tango application file or Tango class file, make sure the following conditions are met:
For more information, see "Adding an Object to the Objects Workspace", "Using Available Object Instances", and "Completing the Create Object Instance Action".
the object associated with that method is available in the Objects Workspace
the object instance to which this Call Method action refers has already been created earlier in the execution of your Tango application file
the information for the object instance is complete; in particular, the object instance has been assigned to a Tango variable.
A Call Method action is a Tango action. The action icon is available on the Actions palette.
The procedure for adding a Call Method action is the same whether you are working with a JavaBean or Tango class file.
To add a Call Method action
Open the Tango application file or Tango class file in which you want to call a method.
Drag the Call Method action icon from the Actions palette to the location you want in your application file or Tango class file. (It must be in a logical sequence after the Create Object Instance action that this Call Method action refers to.)
The Call Method action window appears. The field next to the Call Method action icon displays a message: "Drag a method from the Workspace."
Click the Objects tab in the Workspace to view the Objects Workspace.
Locate the object and method you want to use, as follows:
Expand one of the object types--JavaBeans or Tango class files--that you want to view, by clicking the disclosure triangle to the left of this object type.
Note: The object you select
for your Call Method action must be the same as the object in the Create Object
Instance action that you want this Call Method action to refer to. Otherwise,
Tango Server returns an error during execution of the application file.
A list of all objects of this type appears. (A group of related objects may be contained in a folder.)
Expand the object that you want to use by clicking the disclosure triangle to the left of this object.
A list of available methods appears.
Note: Some methods are listed
under the Attributes folder, if this folder exists. Expand the
Attributes folder to see those methods. For more
information, see "Attributes Folder"..
Select the method you want to use and drag it to the Call Method action window.
The Call Method action window displays the names of the object and the method, as well as the list of parameters for this method. An example of the Call Method action window is shown on The following is an example of the Call Method action window:.
For more information, see "Completing the Call Method Action".
- Complete the information in the Call
Method action window.
Note: You can skip this step
for the time being. At a later time, open this action item and complete the
information.
Close the Call Method action window.
A Call Method action appears in your application file or Tango class file. The default name for the action is the name of the method.
If you want, you can change the name of the action to whatever is appropriate in your case.
Shortcut to Adding a Call Method Action
An alternative approach to adding a Call Method action from the Actions palette is to do it directly from the Objects Workspace. This procedure is a slight modification of the one described on Adding a Call Method Action.
Skip the step involving the Call Method action icon. Just drag the method you want to use from the Objects Workspace to the location you want in the application file or Tango class file.
Completing the Call Method Action
The Call Method action window contains important information about a Call Method action. It allows you to view and edit this information.
You can open the Call Method action window by doing one of the following:
For more information, see "Shortcut to Adding a Call Method Action".
dragging a method from the Objects Workspace to an application file
(when you create a new Call Method action)double-clicking the name of a Call Method action in your application file
(when you edit an existing Call Method action).
The title of the Call Method action window is the name of your Tango application file, followed by the name of the Call Method action, separated by a colon.
You can change the name of the Call Method action in the application file window.
The following is an example of the Call Method action window:
There are several sections to the Call Method action window: object/method name, object instance variable, result variable, and parameter list.
Object/Method Name
This is a non-editable field at the top of the window, next to the Call Method action icon. The object/method name consists of the name of the object, followed by the name of the method, separated by a dot. If no method has been assigned to this action, the field displays the message Drag a method from the Workspace.
Object Instance Variable
This section allows you to specify the object instance you want to use in your Call Method action. You must have created the object instance in a Create Object Instance action and given it a variable name.
Before you complete the information in this section, you need to know the following:
You can view this information by double-clicking the appropriate Create Object Instance action.
From the Scope and Name pop-up menu/text fields, select the appropriate items or enter them.
![]() Caution: The information you
enter in the Object Instance Variable section of the Call
Method action window must be identical to the corresponding section of the
Create Object Instance action window. (This includes the scope and the name of
the variable.) Otherwise, Tango Server returns an error when it executes the
application file.
Caution: The information you
enter in the Object Instance Variable section of the Call
Method action window must be identical to the corresponding section of the
Create Object Instance action window. (This includes the scope and the name of
the variable.) Otherwise, Tango Server returns an error when it executes the
application file.
Example
The Create Object Instance action creates an object instance, MyObjectInstance, from the object, MyObject; the variable to which this instance is assigned is MyVariable, in Local scope. To specify a Call Method action using this object instance, drag MyObject in from the Objects Workspace, and specify MyVariable, in Local scope, in the Object Instance Variable section of the Call Method action window.
Result Variable
The Call Method action may generate a result. The data type of the return result is indicated in parentheses after the Put Result into Variable title. An example is (bool).
For more information, see "Viewing Object Information in the Objects Workspace".
This information is also shown in the Objects Workspace.
![]() Note: If the Call Method
action does not generate a result, it is indicated as (none) after the
Put Result into Variable title. The Scope and Name pop-up
menus are disabled.
Note: If the Call Method
action does not generate a result, it is indicated as (none) after the
Put Result into Variable title. The Scope and Name pop-up
menus are disabled.
If you plan to use the result later in your application file, put the return result into a variable. From the Scope and Name pop-up menu/text fields, select the appropriate items or enter them.
Example
You are using the Interest Calculator object to calculate the interest on a customer account. When you get the result of the calculation, you can store it in a variable called Interest. When you need to use this result later to present a statement on a Web page, refer to the Interest variable.
Parameter List
A parameter allows a Tango application file to exchange data with an object. The exchange can be an input (passing data from the application file to the object), output (passing data from the object to the application file), or input/output (passing data from the application file to the object and putting the new value from the object in the original variable).
Name
This column shows the parameter names, and whether a parameter is an input, output, or input/output parameter. The following icons are used:
Parameter names are also listed in the Objects Workspace. If you want to change a parameter name, do it in the Objects Workspace. After the change, Tango updates the Call Method action window. (You have to close and reopen the Call Method action window to see the new name.)
Type
This column shows the data type of each parameter. There are two categories of data types:
For more information, see "Viewing Object Information in the Objects Workspace"..
Variant (for COM objects only [Windows])
Parameter data types are also listed in the Objects Workspace, in brackets, after the respective parameter names.
Format
This column shows the format of a parameter. A parameter has one of two formats: Variable and Value.
Parameter Type |
Possible Formats |
When you click the Format column of a parameter, the format for this parameter becomes enclosed in a pop-up menu. If the parameter is an input parameter, you can select Variable or Value; otherwise, it can only be Variable.
Value
This column shows the value or variable of a parameter. You can change the values and variables in this column.
-
If the format of a parameter is Variable, this column shows the scope and the variable name of the variable.
When you click the Value column of a parameter, two cells appear. The left-hand cell, which contains the scope name, becomes a pop-up menu. You can make changes by selecting another scope or entering a custom scope. The right-hand cell, which contains the variable name, becomes a text box. Enter a variable name or change the existing variable name.
When the Call Method action is executed, the value for this parameter is taken from the variable specified (Input/Output or Input type) and any output value is placed in the variable (Input/Output or Output type).
Incl. Empty
This column is enabled for optional parameters. With an optional parameter, you can specify whether or not to include this parameter in a Call Method action. Only COM objects can have optional parameters.
Using the Objects Loop Action
In some cases, a method call returns several items collected into an object, called a collection object. The purpose of a collection object is to allow you to work with all the items or selected items in the collection, one by one, in a loop action.
For more information, see "Repeating Actions (Loop Actions)"..
The Objects Loop action is a loop action which works similarly to the For Loop action. You can have nested Objects Loop actions (an Objects Loop action within an Objects Loop action).
The Objects Loop action can work with appropriate objects retrieved from JavaBeans.
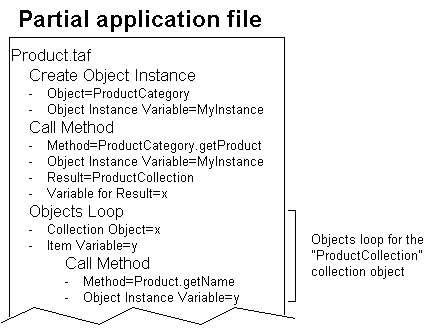
Example of Using an Objects Loop
Suppose there is a group of related objects that allow you to look up and present all the product names in a product category. This involves the following objects:
-
This is an object which allows you to access the collection. This object contains a method, getProduct, which puts the result into a variable, x, assigned to ProductCollection.
-
This is an object which contains all the attributes of an individual product. This object contains a method, getName.
You first create an object instance of the ProductCategory object, using a Create Object Instance action. Then use a Call Method action to call getProduct and to put the result of this method--the ProductCollection collection object--into variable x.
See an example of the Objects Loop action dialog box on The Objects Loop action dialog box appears:.
Now you start an Objects Loop action to work with the items in the collection object, which is the result of the aforementioned Call Method action. This Objects Loop action uses the variable x to refer to the ProductCollection collection object and the variable y to refer to each individual item in the collection.
Place a Call Method action inside the Objects Loop action, to call getName, so that it to looks up and presents the items in ProductCollection. Use the variable y as the object instance variable to refer to the current item in the collection.
The following diagram shows how you might incorporate a sequence of actions in you Tango application file to use an objects loop:
Using an Objects Loop
Using an objects loop requires a sequence of actions, generally including at least a Create Object Instance action, a Call Method action, and an Objects Loop action. The precise requirements depend on the collection object you use and what you want to do with it. Refer to the documentation from your object vendor for details.
For more information, see "Using Available Object Instances".
The heart of the sequence is the Objects Loop action, which works on a collection object. Typically you get a collection object as the result or an output from a Call Method action, which in turn needs to use an available object instance.
For more information, see "Adding a Create Object Instance Action". and "Adding a Call Method Action".
The use of Create Object Instance action and Call Method action is covered in other sections. This section focuses on using the Objects Loop action.
To specify an objects loop for a collection object
Open the Tango application file or Tango class file that you want to use an objects loop.
Drag the Objects Loop action icon from the Actions palette to the location you want in your application file or Tango class file.
Note: The Objects Loop action
must be placed in a logical sequence after a collection object has become
available. Typically, you get a collection object as the result or an output
from a Call Method action. For an illustration of how this works, see
"Example of Using an Objects
Loop".
Complete the information in the Objects Loop action dialog box:
-
The name and scope must be identical to those of the variable assigned to the result or an output (a collection object) from the Call Method action (or the <@CALLMETHOD> meta tag) to which this Objects Loop action refer.
-
This is the variable to which the current item in the collection is assigned on each iteration of the loop. When the counter advances, the same variable name is used for the next item in the collection.
-
Enter the numbers--or meta tags that evaluate to numbers--which represent the items that you want the loop action to start and stop with.
If the value is something other than a number, Tango ignores it and uses the default value (1 for start and the last item in the collection for stop). If you leave the boxes empty, the loop action covers all the items in the collection.
-