Before starting up, make sure that your machine has access to the Internet, and has a static IP address so other machines can see it. If you're not sure about your IP address, look in your TCP/IP Control Panel, and write down the address you see there. If you find a number, skip to Try Out Your Server , otherwise, follow these instructions for testing.
See also: Identifying Your Site: IP, Host Name and DNS .
If you have a machine that is not currently on the Internet and want to try out WebSTAR, you can follow these instructions. Your server machine and any clients on your local network must already have TCP installed. No one on the larger Internet can see your server until you get a static IP address, but you can test your server.
All other fields can be blank.
All other fields can be blank.
If you have a network with TCP connectivity, but without access to the Internet, configure all clients to use the same connection method (LocalTalk/AppleTalk or Ethernet). Make sure they have different IP addresses, higher than the server, such as 192.168.0.3 and 192.168.0.4 .
Then launch a web browser, and give it the test IP address of the web server to access the default page on your WebSTAR server.
To start the WebSTAR server, double-click the WebSTAR application. You'll see the WebSTAR splash screen with the status area at the lower left side. This shows what is loading, and can be useful for troubleshooting. If it launches correctly, go on to WebSTAR Serial Number .
If you have any trouble launching the server, see Server Troubleshooting .
Because this is first time you are using WebSTAR, you are prompted to enter your serial number:
See also Serial Numbers .
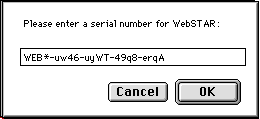
This number is included in your WebSTAR package, or in some cases sent from StarNine via email. The number must be a WebSTAR 4 Serial Number: serial numbers for older versions will not work.
Type your serial number: be sure to enter the number exactly as you see it on the serial number sheet or message, with dashes, capital letters, numbers and no spaces. You can also paste your serial number into this field. Then click OK . If you make a mistake in typing, WebSTAR will show you an error message and let you try again.
To avoid losing your serial number, write it in your WebSTAR manual. You can also save it in a clipping file or on your Mac's Note Pad.
You can request a temporary evaluation serial number from StarNine to test WebSTAR: these last approximately one month. Send email to info@starnine.com for more information.
For a very short test, you can press Cancel in the serial number dialog. You'll see a dialog with a simple math problem: if you answer the problem correctly, WebSTAR will work for two hours, and for a limited number of connections.
Your next step is to enter a password for the WebSTAR Admin program. This allows you to configure WebSTAR using the Admin program from any Mac on the Internet.
If you don't see a password dialog, choose Admin Password from the Edit menu to enter the password. Create a password you can remember but no one else will guess.
For password guidelines, see Safe Passwords .
When WebSTAR starts up as installed, you'll see four windows: the Status window with the Web monitor, the FTP monitor window, the Mail window and the Proxy monitor window. The Status window is the most important:
For more information, see WebSTAR Status and Monitor Windows .
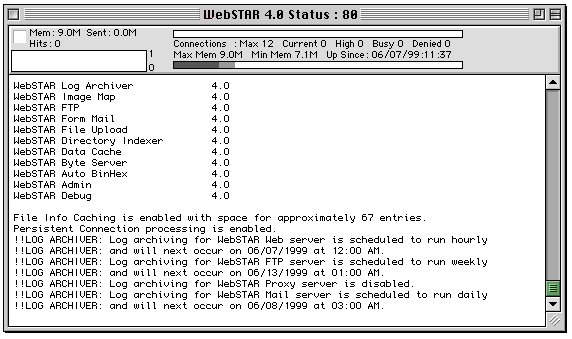
The Status window will display information about the number of connections and the amount of data served. The same window includes a log of web activity, with information about each HTTP request and the results. The separate FTP, Mail, and Proxy monitors each show a log of activity on those servers.
You can use the WebSTAR menus to open and close the windows, update the serial number and Admin password, control the server, and view Plug-In module status windows. For more information, see WebSTAR Server Menus .