The WebSTAR server application is responsible for serving all Web (HTTP or HTTPS), FTP and Proxy connection requests. It includes menu commands for the basic setup of your WebSTAR server. However, to configure and administer the WebSTAR server, you will use the WebSTAR Admin application and the Browser Admin described in Server Administration and Status .

The Server's File menu lets you open the Status window and the FTP, Mail and Proxy Monitor windows, as well as Quit the server application.
The Undo, Cut, Copy, and Paste commands in this menu mainly work in dialog text fields. In addition, you can select text in the Status window and Copy it to the clipboard.
This dialog allows you to set the password for access to the WebSTAR Admin Application . You can only have one Admin Password: if you open this dialog and enter a new password, you will not be able to use the old password. Note that this password is case-sensitive, so you must always match the upper and lowercase letters. For information on keeping your server secure, see Safe Passwords .
The Admin password is not the same as the Administration Realm password. See Accessing the Browser Admin Pages .
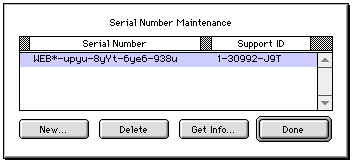
You must have a unique serial number to enable WebSTAR. If you need to edit or change your serial number, use this menu item to bring up the Serial Number dialog. WebSTAR serial numbers will start with WEB* . Localized versions may have other prefixes for the serial number.
For information on testing without a permanent serial number, see Temporary Serial Number .
You may store up to five serial numbers, including expiring demonstration numbers and older version serial numbers. Having more than five numbers may cause error messages at startup.
You must have a different serial number for each WebSTAR server machine that you are running. If you launch a second copy on another machine, you must enter a different serial number.
The serial number is stored in the Web Server Files , so if you remove your settings file, or it becomes corrupted, you will have to re-enter your serial number.
To avoid losing your serial number, write it in your WebSTAR manual and save it in your Mac's Note Pad.
The "Serial Numbers" command in the WebSTAR server's Edit menu opens a dialog in which you can view, add, or delete serial numbers for WebSTAR. The buttons in the Serial Number Maintenance window let you add, delete, or get more information about a number.

Type your serial number and then press the "OK" button. Be sure to type the number exactly as you see it on the serial number sheet or message, with dashes, capital letters, numbers and no spaces. If you make a mistake in typing, WebSTAR will show you an error message and let you try again.
If you have the serial number in a message or on the Note Pad, you can copy and paste it into this dialog (be sure to delete any new line or return characters).

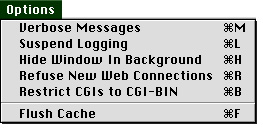
Items in the Options menu let you change the behavior of the server. All selections made in this menu are saved in the server's WebSTAR Settings file and restored the next time the server is launched. The Options menu in WebSTAR Admin and the WebSTAR server application are almost identical.
When this option is checked, WebSTAR displays additional connection and diagnostic information. The information is displayed in the Status window but not recorded in the log. You can also set this in the Browser Admin, Controls Page.
Displaying the Verbose Messages makes the server run more slowly. For normal operations, make sure this option is not checked.
Many of the messages produced by checking this option pertain to low-level HTTP, FTP, Proxy or TCP/IP internal state information. If you are not familiar with these protocols, these messages may seem quite obscure. However, some of the verbose messages can be useful for watching the details of client requests and for troubleshooting.
Errors reported with Verbose Messages enabled should not be reported to StarNine Technical Support.
When this option is checked, WebSTAR temporarily closes its log file, allowing you to open and examine the file with a text editor. No incoming connection data will be logged to the file while this option is checked. You can also set this in the Browser Admin, Controls Page.
When this option is checked, the WebSTAR Status window is hidden when other applications are active in the foreground.
Monitor windows and Plug-In status windows will not be hidden.
When you check this option, WebSTAR will refuse all new HTTP requests, until the option is unchecked. However, it will finish servicing all currently queued requests.
You can also set this in the Browser Admin Controls page
Incoming connections are still reported in the statistics area of the Status window, but those connections are just "knocking at the door"-- they are not being allowed in and the clients are notified that their connection is refused.
This option is useful for gracefully shutting down a server, without causing those who are currently receiving data to get errors.
This menu command works just like the checkbox in WebSTAR Admin: see Restrict CGIs to CGI-BIN .
Forces WebSTAR to flush the memory caches. You can also flush the caches in the Browser Admin Controls page.
Flushing the cache flushes the file, data and DNS caches, and sends a message to Plug-Ins to flush their caches as well (although not the Proxy Cache). For more information, see Flushing the Caches .
The Plug-Ins menu displays the names of all installed WebSTAR server Plug-Ins. When you select a Plug-In from this menu, it may display a configuration interface, status information or version information. The exact action will depend on the Plug-In.
Most WebSTAR Plug-Ins display their version and copyright information, along with a contact URL. WebSTAR Data Cache and WebSTAR SSI will display their information windows. WebSTAR Mail, WebSTAR FTP and WebSTAR Proxy will bring up their monitor windows.
WebSTAR help is in the form of this document, available for printing in Acrobat PDF format and viewing in HTML. To view locally, open your Web browser and choose Open from the File menu, then open this manual from the Documentation folder.