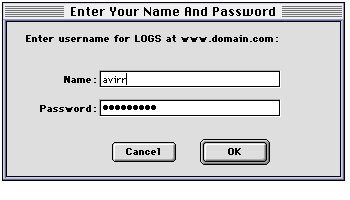
You can associate user names and passwords with realms. This means that when the browser sends a URL which includes the realm match string, the server tells the browser to display a dialog requiring the user to type in a user name and a password for access to that host or page.
For more details, see WebSTAR URL Security Processing .
To create and edit Web User Name and Password entries, you must use the WebSTAR Admin application, as described below.
You can't use the Browser Admin to create User entries.
Choose the Users item in the WebSTAR Admin Settings window to open the Users List. You'll see a list like this, showing you all the Users and passwords in all the realms.
Don't try to enter your user names in order: the server will store them internally in the best order for fast processing.
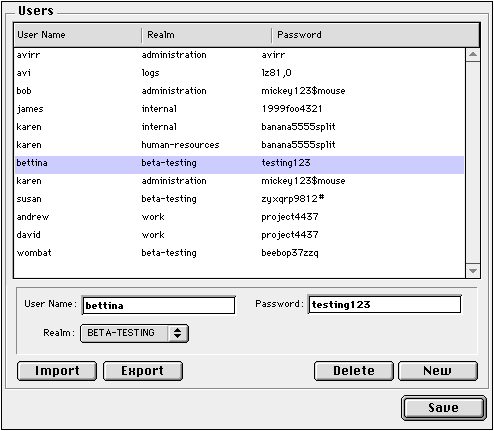
To make a user name entry, select entry before the new entry, and click the New button. Select the Realm from the popup menu, and fill in the User Name and Password fields. Names and passwords are not case sensitive.
For more instructions, see Working With Admin Lists .
The new user name will appear in the scrolling list, along with the realm to which it is assigned and the password.
User names are available immediately as soon as you add them; there is no need to stop or start the server. In addition, WebSTAR can continue to serve files while you are adding user name and password information.
To assign a user name and password to a realm, follow these steps:
http://www.domain.com/mytest/default.html
You can edit thousands of Web User entries in the WebSTAR Admin application, but you may find it inconvenient: the list is not in alphabetical order, and cannot be sorted. If your connection to your server is slow, the transfer time may be quite long.
If your Web User list becomes unwieldy, we recommend that you store and update this data in another application, such as a database. WebSTAR includes Import/Export functions for the user names and passwords.
You can keep user names and passwords in a database, and make all changes in that database. For every change, you then export the list to a file on disk, and import it into WebSTAR. If you do this, be sure that you always make changes in the database, and do not make any changes using WebSTAR Admin, or your lists may become unsynchronized.
To export, click the Export button in the WebSTAR Admin Users panel, and save the file to your disk.
To import, make sure that all your entries are in the file to be imported--you may want to export your existing users list, and combine it with the additional entries. You should always back up your WebSTAR Web Users file. Then click the Import button and choose the text file you have created, and it import the replacement users list.
Importing passwords will replace the existing password file: it does not append to it. Always copy your WebSTAR Web Users file and store it somewhere safe before importing new passwords.
The import/export format of this file consists of one user entry per line, followed by a Carriage Return. Each line has a user name, a bullet, the realm, a tab, then the password.
The user name and realm together should be less than 30 characters.
user name·realm <tab> password <CR>
user name·realm <tab> password <CR>
For example, a file might look like this:
Workers·OUR_WORK TeamWork99
Widgets·CUSTOMERS GetWidgets
Human Resources·HUMRES Be8Safe05
The last character in the file should be a CR (Carriage Return) at the end of the last entry. Make sure there aren't any extra Carriage Returns at the end of the file.