WebSTAR 4 Manual & Technical Reference
Upgrading your WebSTAR Server
It's easy to upgrade from previous versions of WebSTAR: you will not have to change your site organization or HTML files at all. When you install the new WebSTAR server and WebSTAR Plug-Ins, they will read your old
WebSTAR Settings
file and serve your site exactly as it was before.
For information on the changes in this version, see
New Features in WebSTAR 4
.
The WebSTAR Installer will automatically upgrade your server and WebSTAR Plug-Ins
without
disturbing the HTML files, CGIs, third-party Plug-Ins or other items in your server folder. It will make a new folder on the root level of the hard drive called
WebSTAR (old)
with all the files that have been superseded.
Upgrading SSL Versions of WebSTAR
When you upgrade from the CD, SSL will automatically install as well. However, installers downloaded over the Internet will only upgrade an existing SSL set-up, and will not add SSL to a non-SSL site. This allows StarNine to distribute the Installer without breaking US export rules.
See also
SSL Web Security
.
Combining WebSTAR and WebSTAR/SSL
WebSTAR version 2 and 3 had a separate application for SSL serving. This is no longer necessary, as the WebSTAR Server Suite 4 now includes HTTPS and the SSL security features in the main application. You no longer have to run two applications to provide encryption in your web store or other private space.
-
If your previous installation included a
single folder
with both public and private pages, you do not have to make any major changes.
-
If your previous installation had
separate folders
for public and private pages, you should consider combining the folders before upgrading. However, you can still run two copies of WebSTAR in separate folders on the same machine, or use Virtual Hosting (see
Virtual Hosts: Hosting Multiple Web Sites
) with separate folders at the same level and unique IP addresses for both standard and SSL serving, so that private data is never accessible without SSL encryption.
For suggestions, see
Additional Privacy Considerations
.
When running the Installer to upgrade your SSL server, make sure you choose one of the SSL upgrade options, or your version 4 server will not include SSL.
Using the WebSTAR Upgrade Installer
-
1 Quit the WebSTAR server application.
-
2 If you do not have redundant backups, make a copy of your WebSTAR folder onto another disk now.
-
3 Make sure that you have at least 50 MB of free disk space on the working hard disk.
-
4 If you have increased the memory partition to support additional Plug-Ins, make sure you know how much memory to add to the new server. Select the older WebSTAR application and choose
Get Info
from the File Menu. If you are on Mac OS 8.5, choose the Memory item from the Show menu. Your current partition is in the
Preferred Size
field, so write down the difference between it and the
Suggested Size
field number.
-
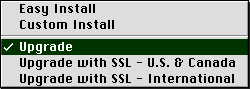
5 Run the WebSTAR Installer, and click on the popup menu in the upper left corner of the Installer window:
Ignore the
Install Location
option when upgrading: your server will be upgraded in its current folder.
-
If you do
not
have SSL (secure server) or you are installing from the CD:
Choose the
Upgrade
option to bring your server up to version 4.
-
If you
do
have SSL installed and are not installing from the CD:
If you are in the U.S. or Canada and are using 128-bit encryption, choose the
U.S. & Canada
SSL Upgrade option.
See
Encryption Levels: US and International
for information on Web Server security and U.S. Government export restrictions.
If you are in another country and are using 40-bit encryption, choose the
International
SSL Upgrade option.
The SSL installer will display another dialog confirming that you are installing from the CD and upgrading an existing version of WebSTAR SSL.
-
6 If you have downloaded the Active Installer, it may need to retrieve some files from the StarNine site. See
Active Installer
for details.
-
7 Next, the Installer will locate all versions of the server on your disk, and let you choose which one to upgrade.

-
8 When you click
OK
, you'll see the Installer unpack and install all your files.
-
9 Allow the Installer to continue until it is entirely finished: do not be concerned by pauses in the installation process.
-
10 The Installer will report that it is finished, and allow you to perform more installations or quit.
-
The Installer has moved your old server files to a
WebSTAR (old)
folder on the root level of your disk.
-
11 Check your Plug-Ins folder: all the WebSTAR Plug-Ins will be replaced by new versions, and all other old files, including
SSI Settings
for counters, should still be there.
-
WebSTAR QuickSend has been replaced by WebSTAR Form Mail: be sure to change any forms that use this Plug-In.
-
If you have WebSTAR WebObjects Adaptor installed, it will be upgraded to WebSTAR WebObjects 3 Adaptor (compatible with WebObjects version 3). You can also install WebSTAR WebObjects 4 Adaptor (compatible with WebObjects version 4) using the Custom Install options. Future installers will automatically upgrade these Plug-Ins separately.
-
12 If you have any aliases to the old server, such as in the
Startup
folder, you must be sure to
delete
them and create new ones pointed at the new server. Your old server has not been deleted, so you could easily launch it by accident.
-
13 If you increased the memory allocation on the older WebSTAR server, add that amount of memory to the new one as well.
See
Server Application Issues
for directions and information on memory usage.
-
14 Double-click the new WebSTAR server application to launch it, and use a browser to visit your site and test all your pages and add-ons.
For more information about the installed files, see
About the Installed Files
.
-
15 If you are upgrading a WebSTAR/SSL server, the first time you launch the new server, it will recognize the old Certificate format and update it to the new format.
Although we have made every effort to retain compatibility with earlier versions of third-party CGIs and Plug-Ins, it is possible that some may no longer work. You should test all your add-on programs to make sure that they are compatible, and contact the developers if you notice additional problems.