The WebSTAR Proxy Plug-Ins are installed automatically when you install WebSTAR, and the server is enabled. To administer your server, use the WebSTAR Admin program. There are four Proxy Settings panels: Connections, Cache and Allow/Deny in this chapter, and Logging Options .
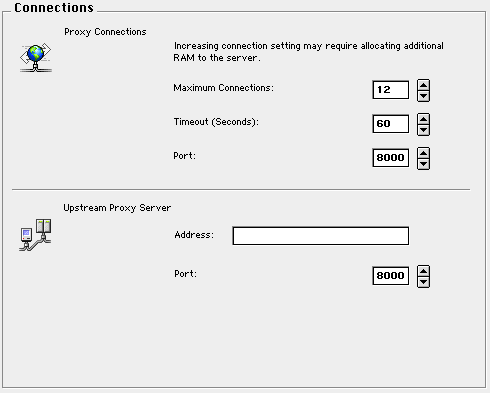
These settings control how the browsers access the Proxy server.

Maximum Connections: Limits the number of simultaneous connections that browsers can request via the WebSTAR Proxy server. Each browser normally uses four connections for each page (or frame) during the time that the data is being received. Just as with the web server, browsers will close connections once they get all the data.
The default is 12 connections, which is enough for a small network. To add proxy support for more browsers, increase this number and increase the RAM allocated to the WebSTAR server by 50 K per connection.
To add memory see Application Memory and Connections .
Port : The port number is used when setting up the browser preferences. If your network administrator is using port 8000 for another purpose, you can set this to any port you prefer, as long as you make sure the browser preferences use the same port.
For port and firewall information, see Port Numbers .
Timeout (Seconds) : If browser or server is idle for a time, the Proxy server will close these connections and accept others in their places. Note that busy servers may be slow sending all the requested data, and may not respond in the specified time. In that case, the browser will display a truncated download. If your users report this kind of problem, increase the timeout delay.
WebSTAR Proxy can now route all requests through another Proxy server. This is useful in situations where a school district has a master Proxy server (perhaps it's doing content filtering) and each school (connected to the school district via a slow net connection) wants to also host their own WebSTAR Proxy server to help improve performance.
Be sure to check with the upstream proxy server before enabling this feature.
Enter the full HTTP proxy server host name and the port number. The default port number is 8000 (the standard proxy port).
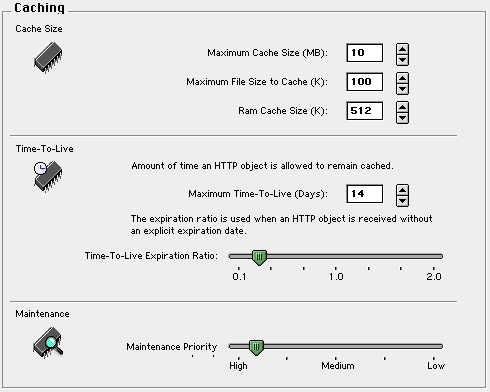
The Proxy Caching panel allows you to specify the sizes and settings for the proxy cache. For more background information, see Cache Issues .

The cache size settings control how much of your server's hard drive will be used for Proxy caching. If you have a lot of room on your hard drive, you can store more data, improving performance for the browsers.
Maximum Cache Size (MB) : Increase this number to enlarge your cache, if you have many people sharing the cache. If you run out of cache space, the Proxy Cache will automatically flush those files which have not been requested by browsers recently.
You do not have to increase the RAM allocated to WebSTAR, because the Proxy Cache is a disk cache.
Maximum File Size to Cache (K) : If you increase the cache size, you can also increase the size of files kept in the cache. If proxy users often download the same large files, this can be very helpful.
Cache RAM Size : Specifies how much of WebSTAR's memory allocation is dedicated to the Proxy Cache in RAM. This stores information about the files in the Proxy Cache, such as their expiration date, last use, number of times used and location. If there is enough room, files which are heavily used are also stored in RAM.
The default is 512K , and is enough for small sites. If you are using the Proxy Cache for many browsers, you will want to increase the Cache RAM size to several thousand K, and performance will improve substantially. Be sure to allocate more memory to WebSTAR to accommodate this increase: see Server Application Issues .
The Proxy Cache must balance cache coverage against the possibility that a page will be obsolete. It flushes files from the cache at specified times, according to these settings.
For background, see Proxy Cache Flushing .
Maximum Time-To-Live (Days) : This setting controls the maximum length of time that the file can stay in the cache before it is flushed. The default value is 14 .
Time-To-Live Expiration Ratio: This slider controls the ratio used by the Proxy Cache to estimate the frequency of file changes, and define an expiration date, described in Time-To-Live Calculation . A lower value will make the expiration date interval very small, while a high value will make it many days or even weeks. However, all files are flushed when they reach the maximum time, as set Maximum Time-To-Live (Days): This setting controls the maximum length of time that the file can stay in the cache before it is flushed. The default value is 14. .
Maintenance Priority Level : The cache is constantly checking the files to flush old files. If you have an extremely large cache, and you feel that files are not being removed fast enough, you can increase this priority. The lower the number, the more priority you are assigning . Note that if you decrease this number, other WebSTAR server functions may be slower.
The default is fast enough to check all files in a large cache at least twice a day.
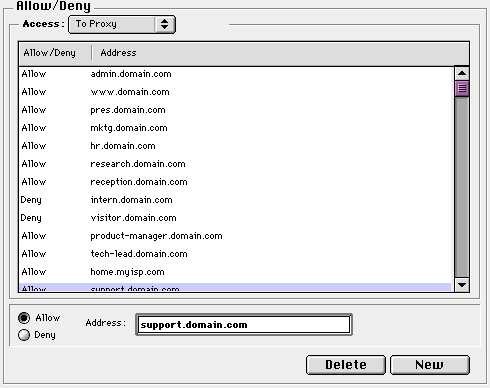
By default, anyone can use WebSTAR Proxy. If you choose, you can specify that it will only accept proxy requests from certain IP addresses and host names. This protects your server from exploitation by anyone outside your organization.
These entries are stored in the WebSTAR Settings file.
In addition, you can specify the sites that browsers using the proxy may access or not access. For schools and other institutions, this allows some control over the Web use in the organization.
You can use wildcards ("*") at the beginning or the end of a host name or IP address. Wildcards will match anything.

If this list is empty, all browsers can access the proxy. To restrict browsers from the proxy, create a Deny entry with the IP address, subnet, host name or domain name. To restrict access to a small number of browsers, create a Deny * entry and then allow specific machines. WebSTAR Proxy will compare the host name or IP address of all requests to this list.

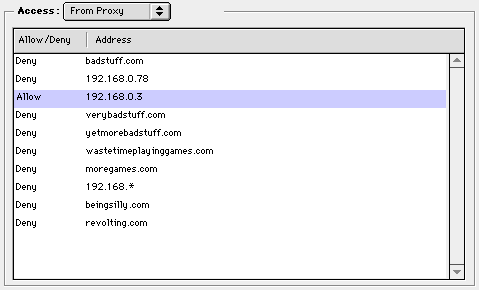
You can also specify which IP addresses, subnets, host names or domain names are accessible through the proxy. If there are sites that you do not approve, you can add them as "deny" entries, and browsers will not be able to access them. They will see an error message saying "You are not allowed access to that URL".
Be thoughtful in your use of wildcards. For example, denying *sex.com will also deny essex.com .
For situations where you have very restricted access to the Web, you can add a deny * entry, then limited "allow" entries, and all other entries will be denied.