 Deny *.spam.example.com
The WebSTAR Mail server allows you to specify exactly who can access the mail services and who cannot. This increases your security, reduces your vulnerability to hackers, and protects your server from spammers who may want to use it to send mail or gather email addresses.
Machines which use dialup Internet access via ISPs do not have static host names or IP addresses, so you can't create Allow entries for them.
As the name implies, an Allow entry for a realm means that the Mail server will accept connections if they come from a machine with that domain name, host name or IP address.
A Deny entry means the Mail server will reject connections if they come from a machine with that domain name, host name or IP address.
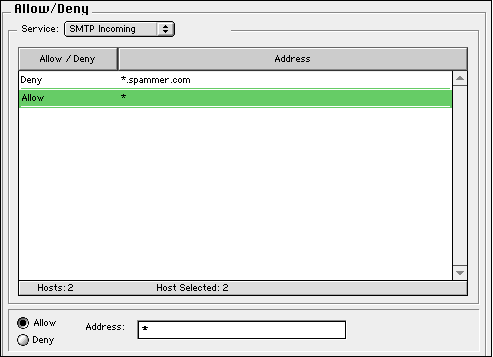
You can reject messages from certain email servers which you know send spam messages to users on your server. For example, if a mail server named mail.spam.example.com has sent several unwanted messages, you could create a Deny entry for that server, and your WebSTAR Mail server will reject all messages from that server.
Use this option rarely and wisely: spammers tend to move around and hijack servers, so you could reject legitimate messages from customers or colleagues.
To accept messages from all other Internet mail servers, be sure to add an Allow * entry at the end of this list.
You can specify that only certain hosts, domain names or IP address ranges can log into your WebSTAR Mail server using the POP protocol. For example, you could limit access to the machines in your institution's domain. However, this means that your users cannot read their mail from home or while travelling if they use a commercial ISP.
You may also choose to allow only specific hosts, domains or IP addresses can use the IMAP protocol to access the server. Again, it can make users who want to access their messages from home or on the road quite unhappy.
In most cases you should Deny access to the LDAP server to everyone outside of your domain. While it would be nice to allow customers or friends to look up email addresses for your users, that access could also be used for address harvesting (spammers gathering addresses for future messages). You might also want to limit access to IMAP accounts to certain domains or IP addresses.
By default, all lists are empty, which means that they allow access to all hosts. This is like adding an entry that says Allow * (where the star is a wildcard meaning to match every machine). You can create entries for specific hosts, domains or IP addresess.
For details of wildcards and domain names and IP addresses see About Address Matching .
To avoid confusion, always create an explicit Allow * or Deny * entry at the end of your list, so you can tell what will happen to other hosts.
To handle these changes, the SMTP, POP, IMAP and LDAP servers will automatically restart themselves. You'll see a message to that effect in the server log.
You can specify host names, domain names or IP addresses in the Address field.
If you want to use host or domain names, makes sure you've checked the box to Use DNS for Server and Client Lookups .
You can use the wildcard (*) to take the place of part of any text, such as the host name. For example, you can deny SMTP Incoming access to a specific mail server which has been sending unwanted messages:
or allow IMAP access to all "tech" machines in your organization, using the wildcard as part of a simple string:
You could also allow LDAP access to a specific IP address subnet
Don't forget to add an Allow * (or Deny *) row at the end of the list, so you'll remember what happens to the other machines.
.For other mail settings, see Mail Users & Accounts and Mail Monitors, Logs, and Reports .