 <!--#echo var="http_user_agent"-->
The valid SSI commands are listed below, with explanations of what they do and how to use them. For a handy reference to these commands and some of the values they use, as well as how they differ from the standard NCSA SSI syntax, see WebSTAR SSI Reference .
See also: Additional SSI Features and Options .
For examples of the SSI commands in action, see the SSI Demo in the Tools & Examples folder.
#echo extends the NCSA SSI syntax.
The #echo command displays a named value in your page. Examples of the available values include the name of the browser requesting the page, the current date, or the URL of the referring file. A typical #echo command might look like this:
which will display the name the current browser uses to identify itself in your page; it might look something like this.
The only tag for the #echo command is var , meaning "variable". It can have multiple "var" tags, to display more than one variable in a single command.
You can use it to display the wide range of environmental variables used in the NCSA SSI syntax. These include the file's local path, URL, and last modified date; the date and time; browser's IP address, and more. For example,
For a list of variables, see SSI Environmental Variables .
will display the last modified date for the current HTML file. See TimeFmt Tag for instructions on changing the time and date format.
You can also display WebSTAR API parameters (otherwise used by Plug-Ins). For a list of these, see WebSTAR API Parameter Definitions .
There are also a few special values that can be displayed with the #echo command:
The #echo command can display counter variables, such as page-access counters (see Counter Command ). Once you have set up counters, you can display them on any page. For example, if you have set up a page-access counter named " main_page_counter ", you can use this command to display the current value:
will show the current random number. This is a number between 1 and 99, which is generated automatically the first time WebSTAR SSI encounters this variable on a page.
You can generate new random numbers on the same page and change the range of the random value: for more information, see NewRandom Tag .
WebSTAR SSI lets you store data in variables for a page or more globally (see Store Command ). For example, if you have created a variable called "soup-of-the-day", you can display the contents of that variable with the command
WebSTAR SSI has also been extended to display any of the parameters available to Plug-Ins. Therefore, you can use an #echo command such as
<!--#echo var="piCurrentFreeMemory"-->
to display the current free memory available to the server. Other options include the host name of the server, the list of currently installed Plug-Ins, the current number of connections, and more. These variables are described in WebSTAR API Parameter Definitions .
#include extends the NCSA SSI syntax to use file path tags as well as virtual paths (see SSI Path Names: Virtual and File Paths ).
The #include command inserts another file into the current page. This feature is extremely useful for displaying standard headers and footers in your pages, or any other elements that are common on multiple pages. Should you need to make changes, you only need to edit a single included file (instead of editing each separate page) to have the change reflected on every page that includes that file.
For example, to include a file named header.txt from the host root folder, you could use this command:
The #include command handles aliases automatically, so if you indicate the name of an alias, the file to which the alias points will be served.
See SSI Path Names: Virtual and File Paths for information on file path formats.
The #include command is powerful, but it can be misused. If your server allows many people to upload HTML files, someone might use this command to get access to files that should remain private. Therefore, this command is disabled by default.
The WebSTAR Admin and browser administration page " pi_admin.ssi " both contain options to enable the #include command, limited to the ssi folder in the cgi-bin folder; or to remove the limits entirely.
See also: #Exec and #Include Command Security .
If you choose to limit #include access to the cgi-bin:ssi folder, you can make aliases of files referred to in your SSI commands in that folder, and store the aliases with your HTML files. This system allows you to keep the logical organization of your site, and make simpler file paths. WebSTAR SSI will resolve aliases and allow you to include those files if the originals are in the safe folder.
#fsize extends the NCSA SSI syntax to use file path tags.
The #fsize command displays the size of a named file. For example,
will show the size of the report5.html file in the disasters folder in the host root folder.
The tags for this command are the path tags "file" and "virtual" as described in SSI Path Names: Virtual and File Paths .
By default, the file size is displayed in bytes, but this can be changed with the Config Command , using the SizeFmt Tag . For example, the commands:
<!--#fsize virtual="wsman.pdf"-->
will display the file size of the wsman.pdf file in K (kilobytes) instead of bytes.
#flastmod extends the NCSA SSI syntax to use file path tags.
The #flastmod command displays the last modified date of a named file. For example:
will show the last modified date of the report5.html file.
The tags for this command are the path tags file and virtual; see SSI Path Names: Virtual and File Paths for an explanation of how they work.
By default the date format is set to look like this:
You can change this format with the Config Command : for information, see TimeFmt Tag .
To display the last modified date of the current HTML file (without requiring a path) see the example in Echo Command .
#counter is not part of the NCSA SSI syntax: it is a WebSTAR extension.
Use the #counter command with a counter variable to increment that variable each time the page containing that #counter command and variable is requested by a browser. For example, the command
will create a new counter variable named "juan's counter" the first time a page containing the command is requested. Then it will add one to its value every time the page is requested after that. The display tag is set to " true ", so the command will also display the current value of the counter variable in the browser.
Counter variables are persistent variables , stored in the WebSTAR SSI Settings file. You can view, edit or delete your counters on the browser administration page as described in Editing Counters and Numeric Variables . Browser access to pages stored in caches and proxy servers will not be counted except when the cache is refreshed.
You can display a page access counter, if you think your viewers would be interested, or hide it and just use it for your own internal statistics.
You can refer to the same counter variable on several pages, and the variable will be updated every time one of these pages is accessed. This lets you use the #counter command to create a counter that keeps track of the number of times a group of pages has been accessed. You may want to keep an individual counter for each page as well, just by using another unique counter variable name.
You can use the same #counter command more than once on the same page, which will increment the counter variable by one for each separate command. Therefore, if you repeat the command three times on the same page, each repeated entry will display a number one higher than the previous entry, and the counter variable will increase by three every time that page is accessed.
The var tag is used to specify the name of the counter variable. When WebSTAR SSI encounters a #counter command, it will first look for an existing counter variable with this name, and will create a new variable if it does not find one. Each time the command is accessed, the named counter variable is incremented by one.
Counter variable names can be up to 32 characters long, and can contain any characters you like, so you can be very descriptive, for example:
<!--#counter var="Counter for Marc & Luke's page"-->
You can use several var tags in one #counter command to increment multiple counters.
The display tag is optional, and controls whether the current counter value is shown in the page or not. If you don't include a display tag entry, the counter value will appear automatically.
Possible values for the display tag are "true", "on", or "yes" to display the current value, and "false", "off", or "no" to stop the value from being displayed.
might look like this in the browser:
will not display the current counter value because the display tag is set to false . The counter named " big hits " will still be incremented by one, but the number will be invisible.
#hide and #show are not part of the NCSA SSI syntax: they are WebSTAR additions.
The #hide and #show commands allow you to turn on or off the display of sections of your HTML pages depending on certain circumstances. You can specify text to appear only for certain browsers, hide page content from those outside specified IP addresses, display messages based on the current date, and more.
Anything after a #hide command will be hidden from the browser until WebSTAR SSI encounters a #show command further down the page that will allow the rest of the page to be displayed again.
Most #hide and #show commands are based on a condition --they are executed only if circumstances as defined by the operator tag are true.
For more information about conditions, see operator (op) .
For example, the following command will prevent the rest of the page from displaying if the browser's IP address contains "192.168.0":
For those IP addresses, the text after this command will be hidden unless there is a #show command further down in the page.
Since the #hide and #show commands turn the display off or on, you will usually have to combine several of these commands to get the behavior you want. For example:
<!--#show operator="contains" value="192.168.0.2"-->
Hi Grandma! I'll be up for the holidays!<BR>
<!--#show-->
The first #hide command turns off the display completely. The #show command following it will then turn the display on only if the browser's IP address contains "192.168.0.2," and show the line of HTML below this command. The final #show command turns the display back on for all browsers. If this page is accessed from a computer with an IP address of 192.168.0.2, this section of the page will appear as:
This will be hidden from browsers coming from any other IP address; they will never know this part of your HTML page existed.
The tags for the #hide and #show commands are variable , operator , and value .
Tags are optional for these commands. If the #hide and show tags are used without any tags, as in:
<!--#show-->
anything following the command will always be hidden or shown.
The following tags can be combined to create your #hide and #show commands.
This tag can be used with any of the variables that the var tag for the #echo command has access to, including current random number, counter variables, and stored variables, SSI Environmental Variables and WebSTAR API Parameters. See Echo Command for more information.
This tag defines the condition . It specifies how you are comparing the variable named with the variable tag to the value named in the value tag. It is optional, and defaults to "=", meaning that the values must match exactly.
This tag is the value that you are comparing the variable named with the variable tag to; it is also optional and defaults to "" (an empty string).
Show a message after a certain date:
<!--#hide --><!--#show var="date_local" op=">" value="1998/02" --><B>It is now after February, 1998</B><!--#show --><BR>
Show a message one time out of 100:
<B>You've won a free T-shirt!</B>
<!--#show-->
<BR>
More examples of the #hide and #show commands in action can be seen in the SSI Demo files installed with WebSTAR in the Tools & Examples folder.
#exec is implemented according to the NCSA SSI syntax, and adds some WebSTAR-specific tags.
The #exec command lets you call a CGI application or a WebSTAR API service routine registered by a Plug-In, and insert the results into your page.
which will run a CGI named greeting.cgi in the ssi folder inside the cgi-bin folder in the WebSTAR root folder. It might return a random welcome message out of a list of several greetings.
If there are any additional SSI commands in the result returned by the CGI or Plug-In, WebSTAR SSI will execute those as well. The final text will appear in the HTML page in place of the original command.
The #exec command handles aliases automatically, so if you indicate the name of an alias, the file to which the alias points will be served.
The #exec command is powerful, but it can be misused. If your server allows many people to upload HTML files, they could use this command to run applications that are not public. Therefore, this command is disabled by default.
The WebSTAR Admin and browser administration page " pi_admin.ssi " both contain options to enable the #exec command but limit it to the ssi folder in the cgi-bin folder, or to remove the limits entirely.
See also: #Exec and #Include Command Security .
If you choose to limit #exec access to the cgi-bin:ssi folder, you can use aliases of files in there. This allows you to keep the logical organization of your site, and make simpler file paths. WebSTAR SSI will resolve aliases and allow you to include those files if the originals are in the safe folder.
There are three main tags used with the #exec command, script , cgi , and piservice , which can also take other associated tags. Other optional tags extend this functionality.
The script tag is meant for use with stand-alone CGIs which are called directly (usually applications that have a .cgi or .acgi suffix), such as AppleScript CGIs. It specifies the file path to the CGI and can use Virtual Paths or File Paths .
The cgi tag is meant for use with CGIs which rely on a Suffix Mapping to execute the actual CGI application, such as Frontier scripts (which usually have a .fcgi suffix) or Tango documents (which usually have a suffix of .qry ). Instead of using the CGI name, the cgi tag specifies the path to a file or script name with the suffix used by the CGI, then looks up the correct Action in the Suffix Mapping Table and executes the appropriate CGI. This works as though WebSTAR had received a URL request for that file.
will find the Suffix Mapping entry for .tmpl" then launch the WebCatalog CGI and pass the file path " special/action.tmpl " as a parameter. The WebCatalog CGI will process the information and return the results to WebSTAR SSI, which will insert the results into your HTML page in place of the original command.
Both script and cgi tags can use the optional post tag to pass information to the CGI. For example,
will call a CGI named chocolate.acgi , pass it the value " 20pounds ", and return the resulting text.
The piservice tag allows you to call a WebSTAR API service routine that is defined by another WebSTAR API Plug-In. An optional param tag can specify any parameters that need to be sent to the service routine. For example,
would look for a registered Plug-In service routine named " TextConverter ", pass it a parameter of "italic" , and insert the results into your HTML page.
In addition, WebSTAR SSI will expand all unknown commands to " #exec piservice= " so this command:
is converted to the piservice command above.
For information about Plug-In service routines, see the WebSTAR API SDK or your Plug-In's documentation.
Plug-In Developers: you can register a Plug-In service routine with WebSTAR SSI: see Calling WebSTAR SSI .
You can also use any named tag="value" pairs instead of the post or param tags. However, if any post or param tags are present, these tag="value" pairs will be ignored.
which will collect the values as "name=joe&return=true" and send them off, URL-encoded, in the post arguments parameter to the CGI that handles the " xml " suffix.
#store is a WebSTAR SSI special command.
The #store command permits you to store your own variables for later access by other SSI commands. The command looks like this:
which will create a new variable named " mammal " and set its value to " wombat ".
The main tag for the #store command is a variable name, consisting of letters, numbers and/or underscores, of up to 33 characters, followed by the value for that tag. The following example will store this text in the variable famous_opening_lines :
You can also use the optional kind tag, which controls how long this variable is available. Possible values for the kind tag are
If no kind tag is specified, the default setting is " local ".
If you give a persistent stored variable a numeric value, it will be displayed in the browser administration page along with the counter variables. See Editing Counters and Numeric Variables for more information on editing these variables.
The #postarg command lets you display named variables that have been sent to an SSI page from an HTML form.
For example, if you have a simple form like this:
It will look like this in the browser:

You can create a page named "showme.ssi" and include the SSI command:
If a person opens the first page and types "Mahalia" and clicks the Submit button in their browser, WebSTAR will use WebSTAR SSI to automatically display the " showme.ssi " page and the text:
The var tag specifies the name of the form variable to display. It should be the same as the value of the HTML form set by " NAME " for the input field you want to display. In the example above, it's " your_name ".
#config is implemented according to the NCSA SSI syntax, and adds some WebSTAR-specific tags.
The #config command controls the options and output format of several of the other SSI commands. For example, this command:
will change the file size output unit to kilobytes instead of bytes. A #config command usually precedes another SSI command that depends on the format change. All #config changes are only applied to the current page.
WebSTAR SSI, when it encounters an error, automatically inserts an invisible error message as an HTML comment.
You can use the errmsg tag to override this and display a message. You may find this particularly useful during debugging.
If you use a command like this at the top of your pages:
any errors will display the text "WebSTAR SSI encountered an error" in your page.
The timefmt tag lets you change the way that date and time is shown. The default format is
which looks like this: "1997/12/25:01:01:57" .
This coding, consisting of a percent sign (%) followed by a single letter code, is replaced by an element of the date or time. All other text and punctuation is retained. For example, %Y is always replaced by a four-digit year.
For a complete list of time format codes, see SSI Field Descriptors for TimeFmt .
If you don't like the default format, you can use the timefmt tag to change it. For example, this command:
<!--#echo var="date_local"-->
will change the date format, then display the current date in the new format:
You can also show or hide text using the new time and date format produced by the timefmt tag, as in this example:
<!--#hide-->
<!--#show var="date_local" op="contains" val="Friday"-->
I'm glad it's Friday! <BR>
<!--#show-->
<!--#config timefmt="%Y/%m/%d:%H:%M:%S"-->
will change the date format so it gets the day of the week, then if the day of the week is Friday, uses the #hide and #show commands to show the line " I'm glad it's Friday! ", and finally sets the date format back to its default value.
See also: operator (op) .
The sizefmt tag controls how file sizes are displayed. It can only have two values, " bytes ", which displays the size in bytes (this is the default setting), and " abbrev ", which displays file size in kilobytes. For example,
<!--#fsize virtual="mainpage.html"-->
will change the file size output format to kilobytes, then display the file size of the mainpage.html file in the new format, as " 47 K ", instead of the old format, as " 47152 bytes ".
The charset tag lets you to select a character set translation to perform on that page. Options are
at the top of your page will turn character translation off for that page.
The default setting is set in the WebSTAR Admin or the browser administration page at " pi_admin.ssi ". For more information, see Default Character Set .
SSI has a random variable, containing a number from 1 to 99, used by the #hide , #show and #echo commands. It is generated for every new page. The #config command using the newrandom tag lets you specify the range that the random number can be in, and generate a new random number. The command looks like this:
which will generate a new random number whose value is between 1 and 10, inclusive.
Inclusive means that it could be 1, 10, or any number in-between.
The value used for the newrandom tag can be any integer between 2 and 10000, which WebSTAR SSI will use to generate a new random number between 1 and the value of newrandom minus 1 (inclusive). The newly generated random number will then be available as the "random" variable.
<!--#config newrandom="5000"-->
<!--#echo var="random"--><BR>
will display the original random number, then change the random number to one between 1 and 4999, and display a new random number.
If the SSI commands on your pages are not being processed at all, chances are something is wrong with your Suffix Mapping. The WebSTAR SSI Plug-In is probably never "seeing" the file, and thus never and getting a chance to act on the SSI commands contained in it. See Suffix Mapping for more information.
There are a number of options you can set using WebSTAR Admin SSI .

To open the browser administration, use a URL like this:
http://www.domain.com/pi_admin.ssi
(replacing the name www.domain.com with your host name).
You can use the interface here to configure counters, choose the character encoding, and specify the level of security.
For information on the character set, see Default Character Set and the Config command CharSet Tag .
While WebSTAR SSI is extremely powerful, it has some security implications. The " include " and " exec " commands let you include other files and run other programs. However, if you allow other people to upload files to your server, they could then use these commands to act without your knowledge. These security options help you restrict access and limit your vulnerability. To understand your options, see Exec Command Security , Include Command Security and the WebSTAR Admin section SSI .
The WebSTAR SSI Plug-In allows you to create and save page-access counters and other variables (see Counter Command and Store Command ).
You can create and change values in the WebSTAR Admin SSI Counters panel:
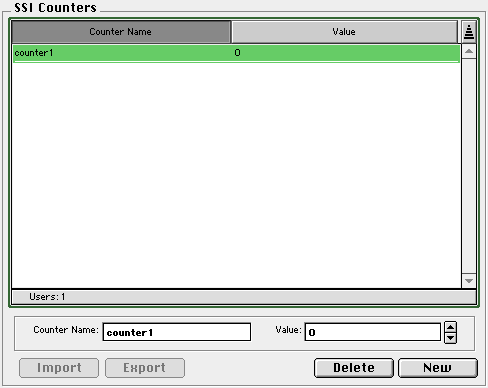
This will update as your data changes from page views and so on.
For numeric variables, you can also see and change the values on the Browser Administration page, " pi_admin.ssi ". For example, if you've accessed the ssi_demo.ssi file, you'll see something like this on the Browser Admin page:

You can edit or delete these values, and the WebSTAR SSI Settings file will be updated when you click the Save button.
Counters and other variables can only accept numbers. If you enter spaces, letters or punctuation, your change will not be saved: the old number will reappear after you save the changes.
To allow WebSTAR SSI to process the special SSI commands in your HTML pages, you must set up a Suffix Mapping in WebSTAR that tells the server to use the "SSI" Action for the files you choose.
The WebSTAR SSI Plug-In automatically registers an "SSI" Action and a Suffix Mapping for .ssi that uses this action, so that any file ending in .ssi will be handled by the WebSTAR SSI Plug-In. For information, see Suffix Mapping Example: Using SSI for All HTML Files , and Actions .
You can indicate that you want to use SSI commands in other files. For example, if you want to use SSI commands in all files ending in .shtml (a common suffix for pages which use server-side-includes), you can enter a Suffix Mapping that looks like this:
This tells the WebSTAR Web server to call SSI for all entries ending in .shtml , for any type or creator code, and to return the MIME type "text/html".
See also: Suffix Mapping Example: Using SSI for All HTML Files .
The WebSTAR SSI Plug-In takes advantage of WebSTAR Data Cache (if installed) and caches files. Thus SSI-processed files may actually be served out faster then uncached files served directly by the Web server.
<!--#exec script="hi.cgi" post="Charles ""Rusty"" Rahm"-->
or
<!--#exec script="hi.cgi" post="Charles %22Rusty%22 Rahm"-->
<!--#counter var = '<!--#echo var="remote_address"-->' -->
<!--#zoink tag="value"-->
<!--#exec piservice="zoink" tag="value"-->