WebSTAR 4 Manual & Technical Reference
Obtaining and Installing Certificates
To operate securely, SSL requires a
certificate
(sometimes called a
digital certificate
or
Digital ID
). A certificate is issued by a trusted third party known as the
Certificate Authority
. The Certificate Authorities covered in this manual are VeriSign, Inc. and Thawte Consulting.
For information on obtaining a test certificate, see
Obtaining a Test Certificate
.
From a user's perspective, the certificate signifies that an independent party (VeriSign or Thawte) has verified that the information in the certificate accurately represents who it claims to represent, and that communications can be encrypted using the certificate's public/private key. This is similar to the Department of Motor Vehicles verifying that the picture on your driver's license corresponds to your name, birth date, and address. The certificate ensures that the user is actually communicating with your host domain name, not with an imposter who claims to be you.
Certificate Formats
WebSTAR Server Suite 4 is compatible with PKCS (the most common standard), Server Gated Cryptography and Netscape formatted certificates.
WebSTAR 4 with SSL will upgrade old certificates: see
Upgrading from Earlier Versions of SSL
.
Certificate Authorities
As of mid-1999, the two most popular Certificate Authorities issuing certificates for WebSTAR SSL servers are VeriSign and Thawte. For information, we recommend that you visit both web sites.
Creating Certificate Signing Requests
The procedures for creating private keys and generating Certificate Signing Requests are the same for both VeriSign and Thawte.
-
1 Generate a Certificate Signing Request (CSR).
-
2 Submit the paperwork and CSR to the Certificate Authority, with payment.
-
3 Receive the certificate.
-
4 Install the certificate.
-
5 Store these vital materials in a safe place.
Generate a Key
Use the
Key Generator
application in the
SSL Tools
folder to generate a file containing a private key for use with your secure server. Follow these steps:
-
1 Launch the
Key Generator
application (in the
Tools & Examples
folder,
SSL Tools
folder).
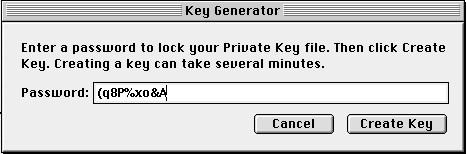
-
2 Enter a password to protect your key. You'll need it later to authorize WebSTAR SSL to use your public/private key pair.
Do not forget this password!
If you do, the private key cannot be recovered: there is no "back door" to this security.
-
Make sure that the password is at least 8 characters long, includes letters, numbers and punctuation, and is not a name or a word. For more suggestions on password security, see
Safe Passwords
.
Write the password down and store it in a secure place, such as a safety deposit box. If you lose the password, you will have to purchase a new certificate.
-
3 Click the
Create Key
button to generate your private key file.
-
4 Name the file something like "Private Key File" (the default), and save it in the root folder for the SSL host (the WebSTAR folder or the host folder if you have a secondary IP host as described in
SSL and Multiple Domains
).
-
5 When the key file is created, the Key Generator will beep and allow you to click
OK
, then it will quit.
-
6 Make sure that the key file is in your WebSTAR folder: if it's not there, move it into that folder now.
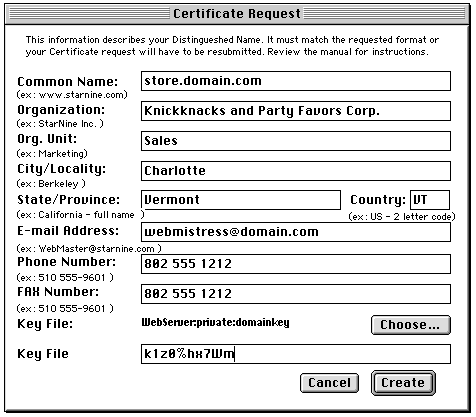
Create the Certificate Signing Request
The Certificate Signing Request process requires that you supply an email address and certain identifying information, as described below.:
Your Certificate Signing Request may be rejected if the information is not properly formatted. Be sure to closely follow the conventions outlined in the instructions. If any of the information is improperly formatted, t The Certificate Authority will ask you to correct it and send the request again.
-
7 Launch the
CSR Utility
application (in the
Tools & Examples
folder,
SSL Tools
folder).
-
8 Type the host name of your Web site in the "Common Name" field, for example:
www.domain.com
-
Make sure that the
Common Name
you specify will be the actual host name of your SSL server--it will be encoded into the signed Certificate and cannot be changed later without purchasing a new Certificate.
-
Furthermore, this host name should be the main "A name" entry for your machine on your DNS server. Your Certificate may have problems if you use an IP address or if the host name is a "CNAME" entry (DNS alias), for example. Contact your network administrator for guidance if necessary.
See also
DNS
.
-
9 Type the name of your organization in the "Organization" field, for example:
Widgets Corporation
-
10 Type the name of the department or other organization unit in the "Org Unit" field, for example:
Support
You must something in the Org. Unit field, if only "store" or "security".
-
11 Type the name of the city or town in which your organization is located in the "Locality" field, for example:
Berkeley
-
12 Type the name of the state or province in which the organization is located in the "State/Province" field, for example:
California
-
Do not abbreviate the state or province name: spell it out as shown above.
-
13 Type a two-letter code for the country in which you are located in the "Country Code" field, for example:
US
-
Do not spell out the country name: use a 2-letter code. The code for the United States is US. For Canada, the code is CA. For other codes, contact VeriSign at
starnine-info@verisign.com
.
-
14 Type the email address of the site's Webmaster or administrator in the "Email Address" field, for example:
webmaster@domain.com
-
15 In the "Phone Number" field, type a phone number where the Certificate Authority can reach you, and type your fax number in the "FAX Number" field.
The Email Address, Phone Number, and FAX Number fields are not part of the Certificate. The Certificate Authority uses these fields to contact you if it finds a problem with the Certificate request.
-
16
Click
Choose
and select the Private Key file you created.
-
Once you select a private key file, the key file and the Certificate you will receive will be a
signed Certificate pair
, and cannot be separated.
If you lose the Private Key file and generate a new one, your Certificate will no longer match. You will have to send a request to the Certificate Authority for a new Certificate, which you may be charged for. For this reason, be sure to keep backup copies of your file in a secure location.
-
17 Enter the password required to access your public/private key pair (the password you entered when generating the key pair, as described in
Generate a Key
).
-
18 Click the
Create
button to generate your encrypted Certificate request form.
-
19 The application creates a file named
Certificate Request
by default. You can use that name or rename it.
-
20 Quit the CSR Utility program.
Follow the instructions in
Using the VeriSign Certificate Authority
or
Using the Thawte Certificate Authority
to order your Certificate, then follow the instructions in
Installing Your Server Certificate
.
Using the VeriSign Certificate Authority
VeriSign calls their certificate a
Digital ID
. To be sure that your Digital ID Request is processed quickly, and that you are following the current procedures, we suggest that you check the instructions at:
http://www.VeriSign.com/starnine/
The process includes these steps:
-
Enroll with VeriSign by clicking the
Begin
button on the introductory page, and filling out the form.
-
Submit "Proof of Right to Use" paperwork to VeriSign with a service fee.
To avoid delays, submit all paper documents together.
-
Generate a public/private key for your site.
-
Define a Distinguished Name (a unique identifier) for your site.
-
Send an email message to VeriSign to apply for your Digital ID.
You can expect to receive an email message from VeriSign containing your Digital ID no sooner than three working days after VeriSign has received all the appropriate paper and email documents.
What Paperwork Does VeriSign need?
Submit a letter on your organization's letterhead identifying the Webmaster for your site, accompanied by "Proof of Right to Use" your organization's Distinguished Name.
Proof of Right to Use
"Proof of Right to Use" means proper documentation of your organization's identity. Choose one of the following types of documentation as appropriate for your type of organization:
-
Business license (for local organizations)
-
Partnership papers (for local or state-wide organizations)
-
Articles of incorporation (for state-wide organizations)
-
Notarized letter from office of the dean (for universities)
-
Notarized letter from a properly authorized person (for government organizations).
Materials provided as "Proof of Right to Use" must be in English. If the original documents are not in English, then they must be translated by an official third party agency before being submitted to VeriSign. Requests including documents that require translation may result in a delay as VeriSign has them translated locally.
Contacting VeriSign
After you have compiled the required documentation and completed the cover letter on letterhead, attach a means of payment and fax the entire package with the recipient name Digital ID Services to this fax number:
+1 (650) 961-7300
Payment Methods
You can use one of these payment methods:
-
Credit card, with the card number, card expiration date, and the name of the card holder.
-
Check
-
A purchase order that includes the date, purchase order number, company name, amount, product, and authorization number.
-
Acceptance of purchase orders is subject to approval by VeriSign. Be sure to fax a copy of your PO to VeriSign at the time of your order.
Sending Paper Copies
As soon as the fax is received, the process of obtaining your Digital ID can begin. However, you must also mail the originals of the entire package to this address:
VeriSign, Inc.1390 Shorebird Way,Mountain View, CA 94043
Corporate Offices: (650) 961-7500Fax: (650) 961-7300Customer Support Line: (650) 961-8820
Generate a Certificate Signing Request
Follow the instructions in
Creating Certificate Signing Requests
Sending the Request to VeriSign
To apply for a Digital ID, follow these steps:
-
1 Use a text editor, such as SimpleText, to open the Certificate Request document.
-
2 Copy the entire contents of this document to a new email message. Do not alter the contents.
-
3 Send the message to this address:
starnine-request-id@VeriSign.com
Make sure that you do not get the older "PEM" format.
Receive the Certificate
VeriSign will send you the certificate, or instructions on how to find it online.
Install the Certificate
Follow the instructions in
Installing Your Server Certificate
.
Using the Thawte Certificate Authority
Thawte calls their certificate a
server certificate
(much like the VeriSign "Digital ID"). Thawte also provides
Wildcard Certificates
and test certificates.
As their instructions may change, you may want to check their website to be sure that your certification request is processed quickly:
http://www.thawte.com/
The process includes these steps:
-
Generate a Private Key file.
-
Create a certificate signing request.
-
Fill out Thawte's online certification request form.
-
Send Thawte your documentation and payment.
To avoid delays, submit all paper documents together.
You can expect to receive an email message from Thawte containing a URL where you can pick up your server certificate approximately three working days after Thawte has received all the appropriate paper and email documents.
Thawte Compatibility
If you or any of your customers are using a browser created before August, 1996, you may see security errors. Go to
https://www.thawte.com/servertest.crt
and follow the instructions to install the Thawte root certificate.
What Paperwork Does Thawte Need?
Thawte requires that you submit a signed letter on your organization's letterhead identifying the Webmaster for your site, accompanied by
Proof of Your Right to Use the Certified Organization Name
and proof of the
Distinguished Name of Your Web Server
.
Proof of Your Right to Use the Certified Organization Name
"Proof of your right to use the certified organization name" means proper documentation of your organization's identity.
Materials provided as "Proof of Right to Use" may be in your local language, if Thawte has an International Representative in your country. Contact Thawte for more information.
Choose one of the following types of documentation as appropriate for your type of organization:
-
Companies, corporations, partnerships or proprietorships
-
Thawte needs a copy of your company registration documents. Thawte will also accept a copy of your articles of incorporation, partnership declaration or income tax registration if it is stamped by the relevant authority.
-
DBAs and Individuals
-
If you have a business name (DBA means "Doing Business As"), Thawte needs a copy of your DBA registration papers for local levies and taxes. Any official correspondence indicating your right to use the name given on your request will generally be sufficient.
-
Government Departments
-
Thawte requires an original signed letter from the Head of that department on the appropriate letterhead, along with contact information for his or her office and immediate superiors.
-
NGOs: Non-Government Organizations
-
Thawte requires an original signed letter from the Chief Executive, Chairman or Managing Director of the NGO, on the appropriate letterhead.
-
Universities and University Departments
-
Thawte requires an original signed letter from the Dean or Vice-Chancellor responsible for that department. Note that this must be on the appropriate letterhead, accompanied by contact information for the University concerned.
-
Special Interest Groups
-
Special-interest groups are popping up all over the Internet: The Apache Group, Debian, Linux Groups and others. Thawte will issue such groups certificates, but requests that you contact them to discuss verification and authentication.
Distinguished Name of Your Web Server
The
Distinguished Name
of a web server certificate is, by convention, set to the domain name of the server upon which the certificate will be used. Your organization will have gone through a process of registration in order to register this domain name. Because Thawte will be issuing a certificate tied to a domain name they need to be sure that you have the right to use a domain.
The procedure that you followed depends upon your location. If your domain ends in "
.COM
" or "
.SE
", you do not need to do anything.
For all other domains, you must include a letter with the following domain name registration information:
-
1 Which authority you registered through (InterNIC, etc.).
-
2 The name and contact information you gave as an administrative contact.
-
3 The name and contact information you gave as a technical contact.
Thawte uses this information to verify your right to use the domain name they are certifying. All you need to send Thawte is a printout of the domain registration application you made, or the "
WHOIS
" output for your domain.
Sending Information
Compile the required documentation and print your letter onto letterhead. Then attach payment and fax the entire package to the Thawte representative in your area. See Thawte's homepage at:
http://www.thawte.com/
for information about how to do this.
Payment Methods
You can use one of these payment methods:
-
Company check (in local currency)
-
Credit Card (Visa, MasterCard, Diners Club, American Express)
-
Bank draft
-
International ("SWIFT") Inter-bank Transfer
-
Stronghold bundle
-
Enterprise Account
Sending the request to Thawte
To apply for a server certificate, follow these steps:
-
1 Use a text editor, such as SimpleText, to open the
Certificate Request
document.
-
2 Copy the entire contents of this document to the Clipboard. Do not alter the contents.
-
3 Use a Web browser to navigate to Thawte's Server Certification Application form at:
https://www.thawte.com/cgi/server/step1.exe
-
4 Choose
Web Server
and continue.
-
5 Paste the Certificate Request text into the Certificate Signing Request (CSR) window as indicated.
-
6 On the pop-up menu for Web Server Software, choose
WebSTAR/SSL 4.0 and later
.
-
7 Indicate your payment method with the appropriate radio button.
-
8 Continue with the forms pages by clicking the
Next
button.
-
9 On page 2 of the Server Certificate Application, examine the information obtained from your CSR to make sure it's correct.
-
10 Use the company description pop-up menu to select an entry that most accurately describes your organization, or use the text box to enter a description of your own choosing.
-
11 Fill out the authorizing contact information as specified.
-
12 Fill out the Web server administrator information as specified.
The email address you provide here is the email address where your notification is sent.
-
13 Make sure you're able to comply with the Payment Procedure.
-
14 Continue with the forms pages by clicking the
Next
button.
-
15 Choose the currency type from the pop-up menu.
-
16 Provide the street address to which any correspondence to you must be sent. Provide an office fax number, if desired.
-
17 Choose the Thawte office closest to you, where you want to send your paper documentation and payment.
-
18 Click the
Submit Application
button.
-
The next page of the process contains a summary of your Server Certificate Application.
-
19 Print and save the Server Certificate Application Complete page.
-
Don't forget to send your paper documentation and payment to the address provided on the summary page.
Downloading Your Certificate
Shortly after clicking the
Submit Application
button, you'll receive an email message from Thawte acknowledging receipt of your application. Contained in the message is a URL specific to your application which, when browsed, displays a "Server Cert Request Status" page. You can use your Web browser to check the status of your application on this Web page.
When Thawte has verified your documentation, received payment and processed the other information it requires, you are sent another confirming email message and the Overall Status item on the Server Cert Request Status page will read, "ISSUED". At that time you can download and install the certificate.
Follow these steps:
-
20 Use your Web browser to connect to the URL in the email message.
-
21 Make sure the radio button for "Standard Format" is checked.
-
22 Scroll down so you can see and click the "Fetch Certificate" button to download your certificate.
-
The "getcert" page is displayed.
-
23 On this page you will see your returned certificate in an encoded form in a new web browser window. The text has a Begin and End statement like
-----BEGIN CERTIFICATE-----
through
-----END CERTIFICATE-----
(other certificates may say NETSCAPE CERTIFICATE CHAIN, or PKCS7 CERTIFICATE CHAIN).
-
24 Save this as a text file in the WebSTAR folder, or the host folder if you have a secondary IP host as described in
SSL and Multiple Domains
.
Save a copy of the "getcert" file in a secure location.
Obtaining a Test Certificate
To obtain a test SSL certificate, you must first create a Certificate Signing Request, or CSR (see
Creating Certificate Signing Requests
).
When finished, open the CSR Request in SimpleText and copy the contents to the Clipboard.
Once you have created your CSR Request you next need to submit the CSR Request to Thawte or VeriSign.
Obtaining A Test Certificate From Thawte
-
1 In your browser, connect to
<https://www.thawte.com/cgi/server/test.exe>.
If you have not already done so, download the test root certificate at
<https://www.thawte.com/servertest.crt>
, which is also linked to from this page. Failure to download this root certificate may prevent your browser from accepting connections from any test certificate you create here.
-
2 Paste the CSR Request into the Certificate Signing Request text field.
-
3 Under Type of Certificate, select either Test SSL Cert or Test SGC 128-bit SSL Cert.
-
4 For the Certificate Format, choose either the "standard" format, the "Netscape cert chain" format, or the "PKCS#7 chain format".
-
5 From the Custom Certificate Options, you can optionally select "Generate a X.509v3 certificate" and/or "Use an intermediate key-signing cert".
-
6 Click the Generate Test Certificate button and save the resulting text to disk. Use a file name like "Certificate".
IMPORTANT: Do NOT save the file as "Digital ID".
-
7 Move the newly created certificate file file into the WebSTAR Server Suite folder, storing it within the root of the appropriate host folder.
Obtaining A Test Certificate From VeriSign
-
1 In your browser, connect to
<https://www.verisign.com/server/trial/index.html>
.
-
2 Complete the Free Trial Secure ID form, entering your First Name, Last Name, Company, E-Mail Address, Phone, Web Server and other various information. When asked to select Web Server select "Other" if WebSTAR 4 is not listed. Click Continue.
-
3 Read the Before You Start information and click Continue.
-
4 When prompted to generate a CSR Request click Continue if you have already completed this step as described above.
-
5 Paste the CSR Request into the Certificate Signing Request text field.
-
6 Enter additional Technical Contact Information, read the license agreement and click Accept.
-
7 Read the Install Test CA Root information and click Accept.
-
8 To complete the process VeriSign will email you a test certificate which that looks something like:
-----BEGIN CERTIFICATE-----
MIICNzCCAeECEE86maRLnPUn0r2uYw/ogNEwDQYJKoZIhvcNAQEEBQAwgakxFjAU
BgNVBAoTDVZlcmlTaWduLCBJbmMxRzBFBgNVBAsTPnd3dy52ZXJpc2lnbi5jb20v
cmVwb3NpdG9yeS9UZXN0Q1BTIEluY29ycC4gQnkgUmVmLiBMaWFiLiBMVEQuMUYw
RAYDVQQLEz1Gb3IgVmVyaVNpZ24gYXV0aG9yaXplZCB0ZXN0aW5nIG9ubHkuIE5v
IGFzc3VyYW5jZXMgKEMpVlMxOTk3MB4XDTk5MDYxMDAwMDAwMFoXDTk5MDYyNDIz
NTk1OVowdDELMAkGA1UEBhMCVVMxEzARBgNVBAgTCkNhbGlmb3JuaWExETAPBgNV
BAcUCEJlcmtlbGV5MREwDwYDVQQKFAhTdGFyTmluZTEPMA0GA1UECxQGYXNmZHNm
MRkwFwYDVQQDFBB3d3cuc3Rhcm5pbmUuY29tMHwwDQYJKoZIhvcNAQEBBQADawAw
aAJhAMRPi5BAe+x3q94BIqI66TieIP0jBQVH1/frgipp+/257tGnbk1JmiCRhhOB
kn4sbYOLq2ag8H476r0twCfjNyNtfNnlI+DKcRZfkkNvON2F8pVR6EInBKvxZTte
EB80zQIDAQABMA0GCSqGSIb3DQEBBAUAA0EAmjiOzPz4kNm6fu/b+DWewIlRVlzs
mXHQnAspxQA1A8Bmtr9oWmf1Drk118nash5gTDAb0ukTNJrll6sXQD475A==
-----END CERTIFICATE-----
-
9 Copy and paste the text into a new text file, saving it with a file name like "Certificate".
IMPORTANT: Do NOT save the file as "Digital ID".
Move the newly created certificate file file into the WebSTAR Server Suite folder, storing it within the root of the appropriate host folder.