All Plug-Ins apply to the entire WebSTAR server, including all web sites under virtual hosting. The WebSTAR Plug-Ins folder must be in the WebSTAR folder so that the server can find it.
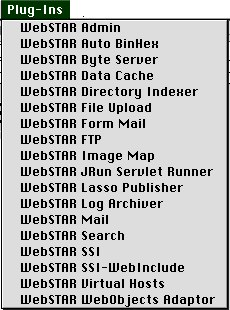
When you launch WebSTAR, the Plug-In names, version numbers, and other informational notes are displayed in the Status window. In addition, the WebSTAR server's Plug-Ins menu will show you the installed Plug-Ins. If you select a Plug-In from that menu, it will display configuration information in the Status Window monitor pane. Some Plug-Ins display a status or information window on the server as well. When you install third-party Plug-Ins, they will also display startup information and appear on this menu.

Other copies of the WebSTAR application running on the same machine will have different Plug-Ins and Plug-In settings.
The "Preferred Size" for the WebSTAR application allocates enough memory to run all WebSTAR Plug-Ins at their default settings. However, the server shares memory with Plug-Ins, so you should watch the server status and increase memory if necessary. If you are not using WebSTAR FTP, WebSTAR Mail or WebSTAR Proxy and remove the those Plug-Ins, you can reduce the memory allocation for the server by 250 K each.
To use some third-party Plug-Ins, you may need to increase the memory partition of the WebSTAR Server. For information, see Server Application Issues .
A Plug-In is only recognized by WebSTAR when it is in the Plug-Ins folder in the WebSTAR root folder when the WebSTAR server starts up. If you put a new Plug-In file into the folder, it will not be used until you quit and restart the WebSTAR server.
The WebSTAR Plug-In files are automatically put in the Plug-Ins folder when you run the WebSTAR Installer.
For information, see Suffix Mapping and Suffix Mapping Example: Using SSI for All HTML Files .
By default, the Plug-Ins included with WebSTAR do not require any special configuration.
If you choose to adjust the settings, just open the WebSTAR Plug-In Administration pages through your web browser. You can access these pages from any browser on the Internet, and make changes to configure your Plug-Ins. You will probably need to enter a user name and password to view this page.
For information on security and access, see Browser-Based Admin .
Open the Plug-In Administration Page using the " pi_admin.admin " URL, like this:
http://www.domain.com/pi_admin_html.admin$adm_plug-ins.html
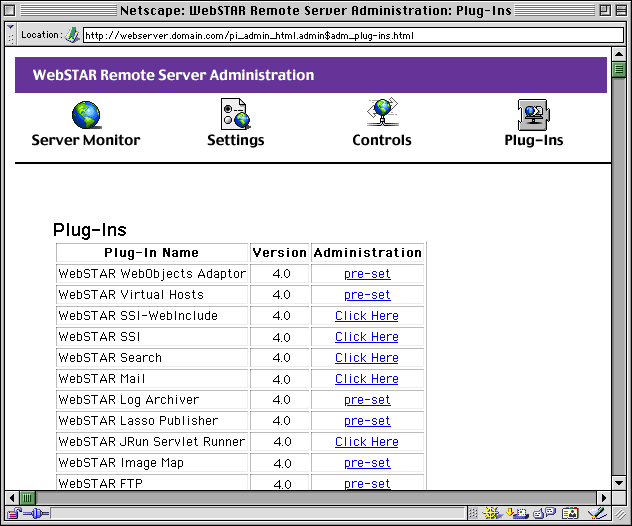
(replacing the name www.domain.com with your host name). Or you can go to the main pi_admin.admin page and click the Plug-Ins icon to see the list of WebSTAR Plug-Ins:

Some Plug-Ins, such as the WebSTAR Image Map, do not require any configuration. You just use them by creating files with the appropriate suffix.
If there are no options available for that Plug-In, or if the WebSTAR Admin application must be used to configure it (see WebSTAR Admin Server Settings ), it will be marked as " pre-set " in the "Administration" column. Clicking on that link will take you to an error page.
For third-party Plug-In administration, see that Plug-In's documentation.
Be sure to click on the Save button when you make changes in the Browser Administration pages--it's very easy to enter the changes and then forget to save them. It's also a good idea to test the changes right away, and make sure you're happy with the results.
Remember, these settings and the Plug-Ins apply to all Virtual Hosts on your server.